Wednesday, March 27, 2013

Bloom card for Spring


I just made a simple, bright-colored, Spring card to brighten someone's day! I'm entering 3 challenges as well. There's still time to join in. I've listed the links and the basic requirements below. Please check each blog for more specific, general instructions and a list of prizes to be won.

 
Supplies:
  1. Bazzill cardstock in medium pink and lavender
  2. American Crafts Moda Bella Preppy cardstock - yellow pattern
  3. Recollections - yellow bling
  4. Wrights seam binding - medium pink
  5. American Crafts - Mini Marks Garden phrases rub ons - bloom
  6. EK Success scallop punch
  7. Paper Shapers for Stampin' Up! - top note
     
Please join me in the following challenges!


La-Vie

A Boy and His Dog

 
Today I have a project inside of a project for ya! First, as an entry into the Repeat Impressions Sketch Challenge #M2013 I created this card based on the sketch provided (see below). I used punches and the creative memories shape cutting system to cut the circles and squares. My son Aidan (almost 4 years old at the time) and our Shih Tzu Barkley (named after Big Bird's dog) are great play partners. 


Surprise!! I decided to use the card as an interactive part of a layout that I am entering into 2 other challenges. This layout is perfect for the "it's a dog's life" challenge at The Stamping Dragon. Since the subject is my darling boy and it's made almost entirely with scraps, it's also perfect for the mid-month challenge at About A Boy!


 The layout features the card with the secret journaling and full sized picture. I've always wanted to try something like this and as simple as it is...I have never tried until today. The cute dog die cut was cut with from the Four Legged Friends Cricut Lite cartridge. All but the base paper - SEI Park Buddies: Doggy Treats - started as scraps from my stash. 


Supplies:
  • and layers cut at 6" from the four legged friends cricut lite cartridge
  • Adhesive - pink Scotch  ATG and xyron
  • SEI Park Buddies: Doggy Treats
  • Basic Grey Mellow: Settle Down (patterned cardstock with the children and dogs)
  • Camoflage paper: Crate Paper - Toy Box Collection: Library
  • Card base - Bazzill
  • Pet food paper (layer inside the card and under the picture on the card front) - Bo-Bunny Cat Treats Paper
  • Everything else is from my stash from an unknown manufacturer


La-Vie

Tuesday, March 26, 2013

WINNER of my 1st RAK!!!!!

Thanks to everyone who entered my 1st RAK. Your goals have inspired me and your kind, beautiful comments about my work have changed me - for the better. My heart is singing to know I inspire you!

Ok, let's get to it! Drum roll please.... and the winner is ....


Great goals and I am sure you are well on your way to accomplishing them all. My crafty goals for 2013 are as follows...

1). Get my crafty space organized! (Hmmm I think I am as organized as it is going to get for now).

2). Catch up on all of my albums from last year. (This is a work in progress).

3). Enter more challenges. (This is a new goal inspired by you).

Ok, I am already a follower of your blog and I will definitely post this on my facebook wall. Heading to fb now to find your page and pinterest.

Thanks for this awesome giveaway!
 
Congrats Cropalcoholic! I've already emailed you to obtain your contact info.
 
Note: winners have 2 weeks to respond with their contact info. Otherwise the prize is forfeited. 
 
...plus a pack of eyelets
 
La-Vie

Anniversary Spinner Card


Today my project is the result of combining 4 different challenges: a sketch from Sketchy Friday, color inspiration from Tsunami Rose Designs, anniversary theme from Hiding in My Craft Room, and the technique of using brayering of sponging from Repeat Impressions. I had lots of fun using most of these materials and tools for the first time. Now that I am organized I use new things so much faster and have been pulling out the older things as well. I loved the sponging technique to create the heart background and the shading on the spinner wheel.

KISS - Keep it Simple... I went old school today with some of my crafting techniques. I pulled out a pencil and traced the circle stamp onto the cardstock to get the right sized circle, cut it out by hand and then re-trimmed it once I stamped the image. It was much quicker than pulling out the Cricut, cuttlebug, dies (because I didn't have a punch the right size). Then I used the sponge and ink to not only ink the edges, but to color in the beige parts of the spinner to give them a pink tinge. Love it! Here's a closer look. The spinner hand is attached with a small brad that comes in the package from Stampin' Up! I affixed it tightly to make sure you know it's an anniversary card. I'm sure it would spin if I affixed it more loosely (and I will next time ... just to see).

Supplies:
  • Cardstock - Bazzill, stash
  • Ribbon - The Paper Studio, Spare Parts
  • Stapler - Memories Direct long reach stapler and staples
  • Stencil - Pebbles: baby girl
  • Embossing - Anna Griffin for Cuttlebug - Smitten (border folder)
  • Punch: Martha Stewart Punch around the page - Topiary
  • Stamp: Stampin' Up! Take a Spin
  • Adhesives: xyron, 3D Zots
  • Ink: Clear and Simple Stamps, Paint the Town Pink
  • Corner rounder - Creative Memories
  • Sponge


wish me luck!!

La-Vie

Saturday, March 23, 2013

Make 'n Takes from Stamp Scrap Art Tour - Oaks PA


I love participating in the make 'n take night dessert party! 8 vendors do projects and you move from table to table with your group (when they tell you it's time to move) and there may be a special price (for that night only) for the kit to make the projects at home. Here are the projects we made in the order we made them.


Tessler Stamps/Stencils instructed us in making a cute piece of jewelry with Washi paper, glue and a square piece of glass. All it needs is the piece to string the necklace and the cord and voila!


Scrapigators taught this super cute tag! The outline is a die cut. We put it on double-sided tape, sprinkled with clear glitter and colored with Copics by laying the brush tip on it's side and laying on the color. Amazing! I decided to place both colors of ink on my tag. There was another style of cupcake with a harlequin wrapper and a cherry on top. I'm waiting for it to arrive in the mail since they sold out at the show.


Purple Daisy Designs lead us in this super cute, yet simple window card. I bought several packs of her pre-cut cards so that I can create to my heart's content!
 
 
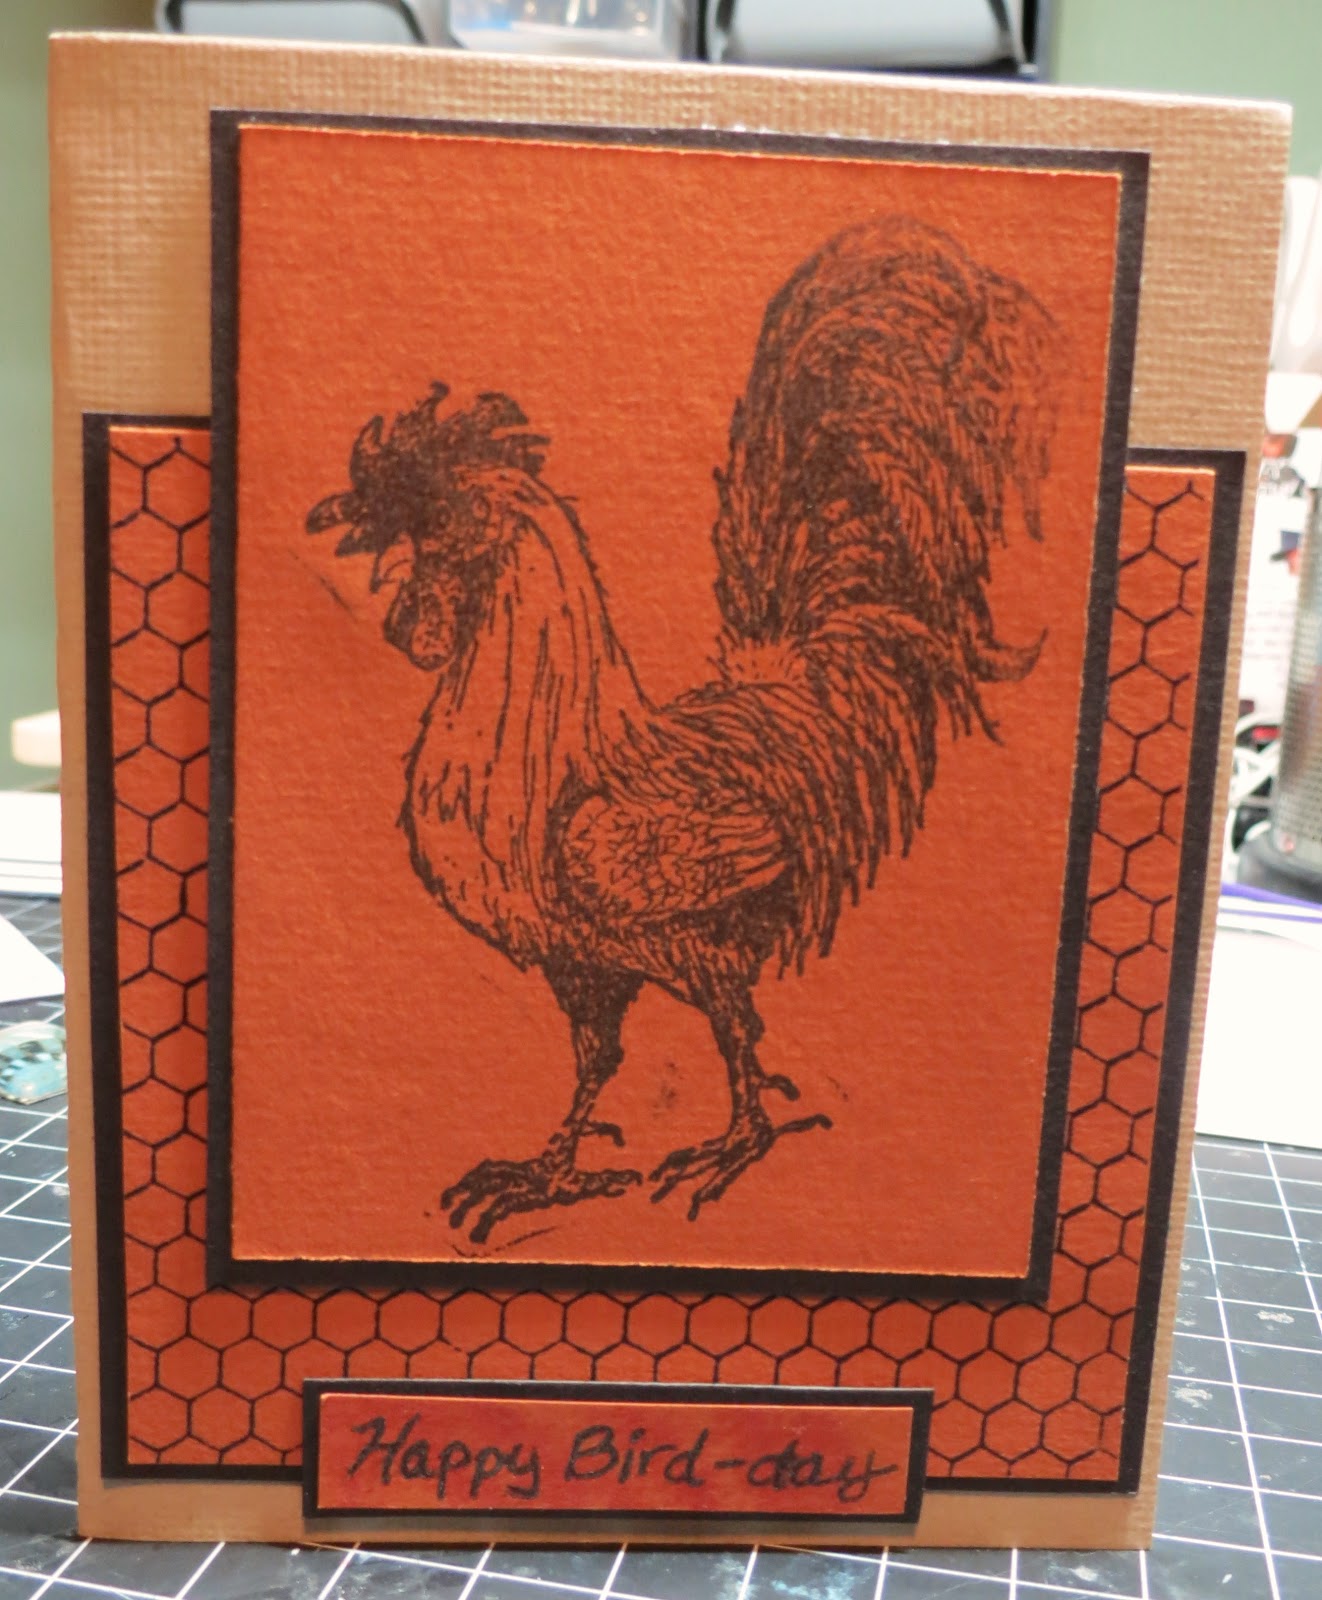
 Rubber Cottage provided the pre-stamped background and Happy Birthday sentiment, while we were tasked with stamping the Chicken. Since it was a large stamp it was a bit difficult. (If only I had brought my red foam stamp mat!!!) This was my second try and it was almost perfect... I had to make my own sentiment though... otherwise the bird and the chicken wire didn't make sense with the sentiment. Hope you like it...!


Repeat Impressions' card was Bee-utiful!! Some of the images were already stamped and some were not. We did all the coloring. I love how it's a unique shape and how it has a tucked closure.


Just for Fun  had a interactive make 'n take. The spiral die creates the inside of the card. too cute and so easy!


Seaside Stampin' Ink was my 2nd fav of the night. It was fun to learn how to make this kind of layered card on glossy cardstock. I plan to make many of these in the future. Using my perfect layers tools of course!!


 Art Gone Wild had my favorite make 'n take of the night. I finally learned a simple way to create pop-up cards. Her special was $12 off for the set to create this card (and others). It included 2 dies and a stamp set that includes the border and several different sentiments.


I won a door prize from Art Gone Wild! It's a huge stamp. The image can be stamped and cut out or used whole. I was so happy I did an Irish jig!! It was close to St. Patty's day (don't cha know?!)


Wendy at Repeat Impressions is a fan of mine! She took this pic and posted to Facebook right after I won!! So cool!!


We got a swag bag as well, but since my friends are not as into stamping as I am, they always give me the extras that they don't want. The gelly roll pen is so glittery!!! Yeah!!!


If you haven't ventured to a scrap expo, please do! It's a great way to have me time, meet new friends, learn new techniques, take classes and to buy new tools to get your creative juices flowing! In a couple of weeks we're going to another one so I'll post my haul, class projects, winnings and the make 'n takes. I am going to participate in an ATC contest too so I'll post that as well.
 
Until next time, stay scrappy!!
 
 
La-Vie

Friday, March 22, 2013

Part 2 Stamp Scrap Art Tour - Oaks PA


I'm back with another installment of my haul from the Stamp Scrap Art Tour. For my first post, click here. I've included a link to each retailer's website. Just click on the name to check it out.


This is by far my favorite stop during this tour because I love to see Kathy create beautiful landscapes on glossy cardstock. Well, I've finally ventured to get some supplies to create some of those wonderful projects. I love their definition stamps and their beach stamps. I also scored some neon flowersoft in the sale bin!!


I found the cutest things at Just For Fun! These little wooden clipboards with working clip, a spiral die (I'll soon show you what it does when I reveal our make 'n takes in my next post.) and a template for their signature product faux post grids and frames. The set came with a plastic template to be used for stippling or tracing and the stamp to match. I can use it to showcase pictures in the shape of the stamp/template. It's very cool but hard to explain.


I love this name!! I was so glad to find items I was looking for - pearl pens, distress ink, black liquid applique and Mosaic Moments tiles! Our make n take featured the cupcake die I purchased and I couldn't deny the cute stamp with the rollers in her hair!


This was the most enlightening make n take and the best special pricing for the kit. I finally learned to make pop up cards!!!!!!!!!! So excited!! The stamps and dies all came in one set together.


I got a full set of really cute pun stamps that can be used as labels for mint tins. They are based on funny ailments we all encounter (click the link above to see them). An example: "Val-yum: The yummy chill pill for PMS, anxiety, or any momentary insanity"


Next, I'll share our make 'n take projects and the door prize I won!! stay tuned...

La-Vie


Thursday, March 21, 2013

Stamp Scrap Art Tour in Oaks PA


Every year I travel to Oaks PA to get my fill at the Stamp Scrap Art Tour (SSAT) specializing in rubber stamps and paper crafts. I love this show because it is small and I can take my time and look through each and every booth. It's also easier to remain connected to the owners. I had the pleasure of having a few friends join me for the scraptastic weekend!! Shout out to Vicki, Christine, Ellen and Becky. We shut it down at the Make and Take it dessert party the night before the show. We, by far, had the most fun of all the crafters. My laugh was notoriously requested by some of the vendors I have come to know and love. It made me feel very good to know that my laughter and happiness helped brighten so many folks' evening.

Today I will share installment 1 of my haul. I was so happy that I bought with intention and often referenced my stamp, ink, pen, etc. catalog to make sure I wasn't duplicating any of my stash at home or buying something too similar to what I already have. Tiffany Spaulding at the ScrapRack taught me how to do it with her free online organization seminars.

Note: each company name is a link to their website. Please check them out. It's good stuff!


This was the first booth I went to. I fell in LOVE LOVE LOVE with the flat back "tin pin" embellishments. They are faces on buttons that fit perfectly on coordinating stamped images. I got the one called little chocolate faces and the stamp set called Eskimo Kisses. Here's an example from the booth of how the finished product looks.


I also was amazed by the Jet Ink Shrink plastic make n take they had. I cut out images the size of my hand and when heated they were reduced to the size of a necklace pendant! In the picture below you'll see I combined two of the images with twine to make an embellishment. I also hit the 50% off box to find bling and the cutest stamps.


The detailed presentations at Inky Antics were amazing! I learned how to make those HoneyPop cards and bought some preliminary supplies to create them at home. They had the perfect layers tools and the Bow easy tools! I'll be sure to post projects using these tools soon.


I was on the hunt for pre-cut shaped cards and I loved the ones at Purple Daisy Designs. I've also gotten a lot of religious sentiments from here in the past.


I got some pre-cut card kits from Repeat Impressions. I'm going to try the peek-a-boo pop ups and the step cards. I got some more flip cards as well and two new flip card stamp sets.


I hit the clearance bin at Rubber Cottage for these Roxs and Stickles - a deal for less than $2 each.


I hope you'll consider patronizing these retailers. Tomorrow I will post the remainder of my haul. Stay tuned!
 
La-Vie


Wednesday, March 20, 2013

My first RAK Giveaway - My top 3 Crafty Goals for 2013


Welcome to my very 1st random acts of kindness (RAK) giveaway!!


Who doesn't like a crafty giveaway? This will be one of many. Today I am giving away, to one lucky random winner, a stamp set, inks, cool metal eyelet alphas and a soft setting tool for the eyelets! I am also throwing in some eyelets (not shown in picture)!!

To enter, you must be a follower of this blog and live in the USA or Canada!!! I have opened up my giveaways to Canada, who often doesn't get a chance to win! Come on Canadians... get in on the fun!

Please leave a comment below with your first name and please answer this question... my top 3 crafty goals for 2013 are... Finally, share this post on Facebook or via email to spread the word about the RAK awesomeness!

My top 3 crafty goals for 2013 are to open an online store to sell my crafts, to get my work published in crafting magazines and to gain a spot on a design team.

For one extra entry each please:
Once you have done so, leave me another comment each time to let me know what you did. The NEW deadline is 4 pm EST this Monday, March 25th. The winner will be chosen using Random.org. Good luck everyone!!


La-Vie

Tuesday, March 19, 2013

Lucky You, Lucky Me card


I'm loving the daily excitement of creating projects for challenges! You've got to give it a try! Today I am entering 4 challenges. The first is a sketch challenge: M613 Sketch Challenge (see below) at Repeat Impressions. The second is a color challenge: going green at Trendy Twine which calls for a St. Patrick's Day theme with a clover, leprechaun (or both),  Monochromatic green (shades of green; no other colors) and Trendy Twine or hemp if you don't own any of their brand.  The third is an "it's all about the green" (plus ribbon) theme at 3 Girl Jam. Last but not least - is an Action Wobble challenge called seeing double. They asked for a project that has two of something that's exactly the same and to use an action wobble. I think my project was a perfect marriage between the three challenges!

 
Supplies
  • Action wobble
  • DCWV pre-cut, textured, green card 5.5 x 5.5"
  • border- cardstock from my stash - floral punched with EK Success border punch
  • dark green patterned square - Bo Bunny Mama-Razzi slides
  • light green grid cardstock - stash
  • hemp twine - stash
  • ribbon - Wrights seam binding - green adorned with Dahlia embellishments Stampin' Up!
  • ink - Tim Holtz Distress Ink - Forest Moss to stamp the sentiment and ink all edges
  • shamrocks - DCWV Nana's Kids stack and Cricut lite cartridge Celebrate with Flourish cut at 1" real dial size ON
  • Sentiment - Stampin' Up! Afterthoughts (hostess)
  • creative memories corner rounder
  • X-acto knife for cutting a slit for the seam binding to pass through
  • adhesives: xryon, zots, scotch ATG, glossy accents


This  project was a journey! Keeping in line with all the requirements and still exerting my creativity while trying new techniques was exhilarating! Quite by chance, I ended up with 2 double elements -the shamrocks and the dahlia seam binding bows. I have been watching some folks outline die cuts with twine. I love the look but have no idea how they keep the twine straight and not gluey looking?! I struggled with outlining this simple shape using glossy accents. Any tips and tricks would be greatly appreciated!! Please leave it in the comments section. I am in love with my Stampin' Up dahlias and their stamps (of course!). They always seem to have a perfect saying for my projects. AND being organized with the ScrapRack allows me to be familiar with my stash and know exactly where to find it. That makes being creative so much easier and fun!
 

here's the action wobble!

On to the next adventure... my workout!! I promised my husband/trainer I would do it as soon as I posted this... gotta keep my word.


La-Vie