Saturday, September 29, 2012

Disney Toy Story layout


While we waited to meet the toy story characters there were many picture stations. My son was asleep in the stroller (right after the playhouse disney breakfast) so I got a lot of pics of just my daughter. She was quite creative with her poses which helped with the whimsy of this 2 page layout.


I decided to use the orange mosaic moments grid paper and some different ways to cut the pics other than the 2 punches I usually use. There are endless combinations. It's all based on your mind... When I ended up with blank spots I used scenery - in this case a brick wall to fill in. I love how it turned out.


I used washi tape from Queen and Company to create a background for embellishments. The circles and the chevrons seemed Disney-ish to me, LOL! The embellishments are from EK Success but bought from Escape Scrapbooking.


This is the second page of the layout with another dose of washi tape under a journaling block. My son was wheeled in the back door at the last min to take the picture. I loved the reaction of the characters to my daughter's beaded hair and my son sleeping. Imagine his surprise when I showed him the pictures. He did a double take for sure!


The professional pics blend together with the shots I took perfectly. There was only one shot that I did not get because my daughter got weary of taking pics and waiting to meet woody and buzz. But then she was as shy as could be in the pics with the characters. Go figure.... kids are not to be explained.


La-Vie

To view more of my Disney pages check out these links:

Thursday, September 27, 2012

Playhouse Disney Layout


I thought it would be great to have breakfast with the characters my kids watched on tv - wrong! My 6 year old was in "this is baby stuff mode" and my 3 year old was scared to death of these bigger than life figures. We made the best of the situation and have funny scrapbook pages to reminisce.


I used mosaic moments grid paper to create a mosaic of the experience. It's a great way to merge many pictures into a perfect scene. When there were parts of pictures that were not flattering or were blurry I cut that part off. But you'd never notice what is missing even though there are clues. That's why I love these types of mosaic layouts. It allows you to keep what you love and weave them all together nicely.


 I decided not to cut every picture into 1" square to highlight the most special memories. I also feel it allows the eye not to get overwhelmed.


Here's the second page of the layout. I was specific about limiting the pics I was going to scrapbook and often found the grid paper could hold more pics. That's where my creativity kicked in. I used scraps of paper from the pazzles pack to fill in the gaps in the layout and I cut a Queen and Company felt adhesive border cut in half to accent each page.


EK Success makes transparent stickers for Handy Manny. These were the perfect addition to this layout. I left plenty of space to journal about how the breakfast went and all the new friends we met.


My favorite was June with her huge head bobbling on her body. What's your favorite Playhouse Disney character? Stay tuned for more Disney Mosaic Moments layouts.

La-Vie

To view more of my Disney pages check out these links:

Tuesday, September 25, 2012

Disney Monsters Inc.


I'm back with another Disney scrapbook page from my personal album. I hardly ever scrapbook for myself these days so this is a joy! This moment was special because it was the first time we had gone to Disney and experienced the magic. Mike asked for a hug in the photo session which made me laugh and my daughter played photographer as the Disney photographer captured us all. Priceless! I will journal all about it in the green space to the left. My style is to journal last when I'm in a quiet moment.


This film strip from Paper Wizard seemed fitting because we were in Hollywood Studios. It came with the celebration balloons but I added a stock photo of sully that came on the Disney Photo CD to one of the openings. The background paper is from Disney's Magic Kingdom Dazzles for Scrapbooking by Hot off the Press.


I'm new to Washi tape or paper tape. I love this Disney themed tape from Queen and Company. I used it here as a border to cover up the grid marks on the paper without having to cut an additional mat. Using a 1" marvy punch I created a mosaic out of the picture of my daughter playing photographer. Adhesives of choice were repositionable xyron and my pink ATG gun.

for the love of scrapbooking... we loved Disney so much and hope this scrapbook will bring across that feeling.

La-Vie

Sunday, September 23, 2012

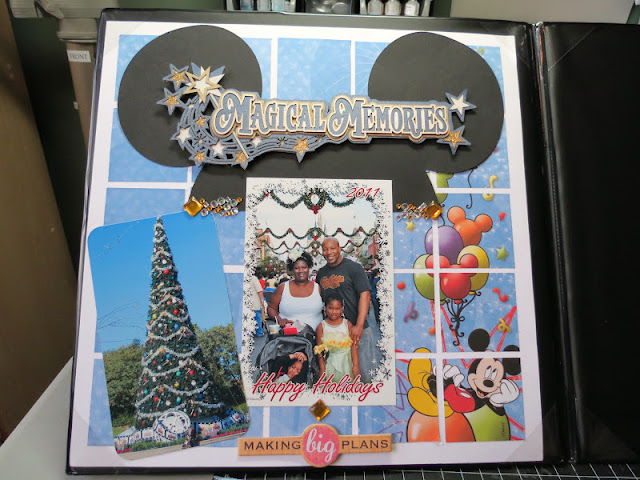
Disney Magical Moments


This week I will share some special Disney layouts. While at the Embellish It! Play all Day event in Cranbury, NJ I continued working on my Disney album using Mosaic Moments grid paper. Here is my opening page for the album. I decided that I didn't want to stop the creativity to record all the brands of embellishments etc used on this set of scrapbook pages. I will note things as I remember though. 


The mickey ears and title are from Paper Wizard. I love their laser cut titles. Most of this one was already assembled (which was great!). The blue background paper is from Disney's Magic Kingdom Dazzles for Scrapbooking by Hot off the Press. This layout was simply embellished with bling and a chipboard sentiment. To create the background I used a 2 1/8" square punch by marvy.


For the love of scrapbooking....

La-Vie

To view more of my Disney pages check out these links:

Friday, September 21, 2012

Hot Pink Zebra Print - Baby Shower Sash


No baby shower is complete without the sash identifying the mom-to-be (as if the baby bump is not enough!) My client asked for this sash to be a funny one. We've all heard the baby mama jokes so she wanted to showcase that on her sister's sash. This is the first time I've made a sash and I like how it came out. It perfectly carries through the hot pink zebra print theme without being overwhelming.
 
The hunt for just the right sized ribbon was a daunting one, but I finally found this 3" grosgrain ribbon at JoAnn's Fabrics in the hot pink of my dreams, LOL! Once I found it, I purchased 1.5 yards. I chose the Jubilee font because it was long and skinny. I didn't want any of the letters to extend further than the front of her body so it could be read at all times. Jubilee has a font shadow (cut in black) and the main letters (cut in glossy hot pink zebra print cardstock). I cut the capital shadow/letters at 2" and the lowercase ones at 2.25" because the uppercase letters were too long to fit on the sash at first. Once all the letters were cut, I ran the zebra print letters through the 1" xyron and adhered it to the shadow.


There are many ways to attach cardstock to ribbon, however, I decided to try something new. I had an 8.5x11" sheet of wonder tape by ranger (double-sided strong tape) and decided to cut it with my Cricut. I only cut out the shadow of the letters using the vinyl setting to perform a kiss cut. That way the tape was cut but the backing for the wonder tape was not. If I cut all the way through, the letters would have been hard to take off the backing because they would have curled up too much.
 

wonder tape with the letters I cut removed to show kiss cut
One by one, I removed the red top sticker, placed the layered letter cut on the corresponding letter and then removed it all from the mat. It was quick and no trouble to work with at all.


the pre-set settings for the kiss cut used with vinyl and wondertape


This tape is permanent and has a strong hold so I had to line up the letters ahead of time and note where the words would start and stop. That made placement a breeze.


To hide the fact that a bobby pin closure is located at the end of the sash (to join the part on her back to the part on her front at her side, I created this embellishement with a circle punch, bling brad, paper studio fabric flower and a jumbo zot glue dot. Surprise!! Ths sash was a hit at the baby shower. And now it's a regular part of my crafting repetoire! You can have yours for $20 (+tax shipping & handling).


La-Vie

Tuesday, September 18, 2012

Hot Pink Zebra Print - Embellished Wooden Letters


My client wanted to have wooden letters that spelled the baby's name to decorate the gift table at the shower and subsequently to decorate the nursery. She originally asked for only 3 letters to be adorned and the rest to be blank. Even though this was my first time making this kind of project, I knew exactly what I wanted to do! Luckily I found these sturdy letters from Hobby Lobby to carry out my plan. These letters can be hung on the wall or stand independently on a flat surface.


To carry through the hot pink zebra print theme, I used glossy cardstock from Paper Studio Safari Untamed. I chose to cover the S and three As with the cardstock (every other letter). To acheive the look, I turned the cardstock over, half with the stripes going down and half with the stripes going across and traced the letters faced down (or else they wouldn't have matched when turned over) with a pen. I then used my fav new scissors by Tim holtz to cut out the shapes.

Using the wide teriffically tacky tape I adheared the cardstock to the letters. Trimming away the excess paper with an exact knife was the next step. Then, I filed the edges to make them smooth with tim holtz sanding tool and the We R Memory Keepers sweetheart distressing tool (for those hard to reach places). Applying a thin coat of Mod Podge to seal the edges worked wonders! Once they dried overnight  I began embellishing with ribbon, bling, brads and flowers.


One of my tried n true techniques when working on color-specific projects is to use my copic markers to color clear bling to match the project. Here I used bling borders cut and colored with a hot pink copic RV09 Fuschia to adorn the top of the M.

 
I used a 1" circle punch, black cardstock, a bling brad, and a flower embellishment by Paper Studio with more of the colored bling to create the beautiful R. My adhesive of choice is Zots from petite to Jumbo sized depending on the embellishment. This is a treasured keepsake for years to come for $65 (plus tax, shipping & handling) it cannot be beat!!
 
 
La-Vie

Thursday, September 13, 2012

Hot Pink Zebra Print Diaper Cake... OH MY!!!


Since I have been more organized, I have been able to craft for hire (like I'm supposed to be... LOL). My first client in a while was a friend from high school that I reconnected with on Facebook. You've gotta love it! She threw a baby shower for her sister with a hot pink zebra print theme and hired me to completed several decor items for the blessed event. The first I will share with you is the 3-tier diaper cake I made. This is the second one I've ever made! Check out my first for comparison if you'd like. While both are special to me, I am especially fond of this one because it's girlie and much more functional. While my first cake was for decoration, this one was to be used on the baby so I had to discover a different way to create it. I love how it came out! Don't you?????


Here's another view of the diaper cake all dressed up and ready to go! I love that is has a headband, tulle skirt and 2 flowers (that can be used with or without the headband and skirt) for the baby.


I went to hobby lobby for the supplies on many different days. On this one day in particular, I happened upon a hot pink and zebra print diaper cake kit! I couldn't believe my eyes!!!
 
 
I was planning on making the same sorts of things (actually had the supplies in my basket) to adorn the cake. This was a much better option and now I can make it in any color after studying how easily it is made. There is tulle tied in knots on the bottom row of the adult-sized stretchy headband all the way around to make the skirt.
 

At target I found the perfect adornment for the top! A darling pair of baby booties! Even if these cannot be used (my kids had awesomely long feet at birth and cute newborn booties didn't fit) they are a great keepsake for the baby.


Ok, let's get down to construction! It took 100 diapers to make the cake. I learned how to construct this diaper cake online by watching a slideshow set to music by Diaper Cakes by Becca. (Note: this link has broken before so google it if it doesn't work.) It was a lifesaver! I plan to make all my diaper cakes like this because the rolled ones look less uniform and less professional in my eyes. Shout out to Becca for a great tutorial that anyone can follow. Here is my bottom layer and the hair conditioner tub (seen just behind the diaper cake) that I put in the middle to hold the shape as I layered the diapers.

I wanted it to be well supported (a fact I missed on my last cake) so I bought real 14" cake board from hobby lobby. I made the first layer of the cake first to make sure I had bought the right sized cake board. Then I covered the board in hot pink cardstock by paper studio.

In order to make sure there was nothing stuck to the diapers, Becca suggests using scrap ribbon to tightly secure the layers of the cake and then sticking the decorative ribbon to the scrap ribbon - brilliant!!


Here's the cake board covered with cardstock and all three layers adorned with almost 3 yards of flocked ribbon by ribbon boutique. I decided to carry through the pink by using my E2 Cricut Expression to cut circles at 10.5"  8" and 6" from the basic shapes that came loaded in the machine.


To complete the look I put the cake in a shrink wrap bag sized 30x30 to make sure no smells from cooking etc set into the diapers before delivery to the client. From what I hear, the shower divine and my crafts were a huge hit. I'm smiling from ear to ear.

Tune in next time for more hot pink zebra print crafts I made for this shower. Prepare to be amazed... LOL


La-Vie


Monday, September 10, 2012

Project Organization continues! - embellishments

 
Tiffany Spaulding inventor of The ScrapRack has changed my organization life!! I've been taking her get organized challenge (via recorded sessions from last spring) so that I can permanently and definitively organize all of my craft supplies. I'm so excited that her next live 8-week online seminar for organization starts Sept 11 2012! It's free! Sign up and use whatever you have to get organized. I have found that the ScrapRack is definitely worth it and is very useful for storing all kinds of craft supplies. 


In my last post I showed a picture of my empty ScrapRack as I organized my paper stash. Here's my ScrapRack full to the gills with my organized embellishments. It is so full that I need to purchase an expansion base. Free shipping comes up again for black Friday so that's when I will make my move!! OK, so how did I get all of my embellishments from drawers, boxes, bins, bags into this one spot??? Well I started out by putting all my ScrapRack pages sorted by number of pockets in one of the spinders that comes with the set.


This way I was able to easily locate all my pocket pages quickly and neatly. I then used my sorting templates on the floor as I did when I sorted my paper. Tiffany warns not to try to do all the sorting in one sitting if you have a lot like I do, but I am obsessed with getting one job done before moving on to another. So against all better judgement I pulled out every embellishment I had and sorted it. Now this came with great peril. I have young children and a dog who lived for trying to mess up my piles. So I had to work hard to get everything contained within a day. That meant long hours and sleepless nights (don't do it the way I did!). But I am happy with the results.

I sorted into the 4 sections - alpha/numeric, themes, calendar and rainbow. Most of my embellishments are in the themes section. Using the ScrapRack dividers gives the pages stability and really helps to categorize everything. When I ran out of the dividers I marked the sections with message flags. Later I replaced those with Post-it Angled Filing Tabs (durable, writable and repositionable). 24 come in a pack with 4 colors to choose from and 2 different color families available at Staples.


After organizing and filling my ScrapRack, I was left with only a small basket and a drawer of embellishments to sort at a later date. Astonishing!!! Note, I did not yet attempt to organize all my smaller embellishments like brads, eyelets, buttons etc. These are only the larger items and bling.


This is all of the stuff that didn't belong in my craft room that I got out and all of the containers I had previously purchased for organizing that did not help at all! Just about everything that was in these containers is in the ScrapRack now!!!

 
And now for the big reveal.... my craft room is starting to look much better! I can actually see the floor and my desk is clear. If I need something I can find it instantly. It has fueled my creativity big time!


Organizing my embellishments has given me more time and time is money! I can quickly find all the options for a project and be done lickety split! I am LOVING it!!
 
For the next step... on to mounted and unmounted stamp organization.... the toughest, but most needed job yet! This is going to revolutionize the way I am able to locate supplies and create on the fly. So excited!
 
 
If you'd like to see where I started and the things I learned along the way, check out:


And here's some storage tips:


La-Vie

Friday, September 7, 2012

Organization - Free classes with The ScrapRack

I'm so excited to share with you my newest obsession... getting my craft room permanently organized!!! I took a live class on organization given by The ScrapRack at CKC Lancaster in July this year and it has changed my life forever! Right after class I went to the booth and bought the show special. It was the scraprack, the travel case and lots of pocket pages and divders. If you would like to get organized too, sign up for the next free online seminar starting Sept 11 2012. I couldn't wait so I purchased the recorded audio from the last seminar and listen at my leisure.

I also joined a facebook group based on the seminar called 2011 Get Organized Challenge Group. Shout out to all the ladies that have checked out my blog for the cuttlebug storage idea I scraplifted from my fav blog and for sharing such great support and ideas.

What I am about to show you is the horror of a craft room. This is where I started. My craft room had become a catch all for the whole house. Every time I wanted to clean up, more and more stuff would end up piled in my beloved craft space. Brace yourselves... ( I cannot believe I am showing y'all this...)


OK.... now that I have confessed, you can see why I desperately needed to organize. I could never find that special something I wanted for a project and I had been buying container after container and organizing for 6 months prior to taking the class. All the while I was buying more supplies like a crazy woman. Nothing was helping 'til I went to the ScrapRack class.

As they suggested I started by clearing a space that would only house organized items. I placed my empty ScrapRack on it. The organization system is made of a 4 section system to put everything in its place. Alpha/Numeric, Themes, Calendar and Rainbow. I started with my paper so there's only 3 sections for that (no alpha). My solid paper was already sorted by color so I needed to put it in alpha order and add the newest paper I bought over the past months. I had plastic paper storage holders from cropper hopper already so I used those to stand up my paper under my desk with the ScrapRack on it.


While I was pleased with my first bit of progress, I noticed that I did not have enough of the cropper hoppers and they did not stand independently. Aaaarrgghhh! The one thing about me is, when I start I want to finish and I want it to be done. I was very discouraged with not having every storage item I needed. So, I decided to go in a very different direction. I bought 3 of the shelf cubes and placed them under my desk so that the paper would still be stacked vertically.


Then it was off to sort all of my patterened paper and stacks. That was a major major undertaking. I put out sorting templates on the floor and sorted almost everything I own into the 3 categories. I found out that the most paper I have all have a floral design.


Once I sorted the paper and stacks, I incorporated the patterned paper with the solid. Now all my black patterened paper is behind my solid black in alpha order (chipboard, dotted, floral, striped, etc.) as suggested in the seminar. All of the paper stacks are in order by theme or calendar. Instead of taking them apart, I used 2 address labels and stuck them to the cover and each other. Using a sharpie I wrote the category on the label and placed it in shelving I already had. It is so easy to find all of my paper now based on this system. Here is a glimpse at my new storage solution. It is hard to take pics under the desk.... all of the dividers aren't showing in the picture as well.


At the end of my sorting, a week of work off and on, I ended up with my 8x8 stacks, 6x6 stacks, mat stacks a small amount of paper left to sort. But 96% of my paper is permanently organized!!! On to embellishments.... This process takes at least 8 weeks (most likely more) and bit by bit, I will finally get organized! Join me....


La-Vie