Wednesday, July 31, 2013

Tune in this weekend!! Kraftie Kre8ations Design Team Reveal!!


Guess what???I was accepted to another design team and I am so overjoyed!! Kraftie Kre8ations is a closed Facebook group for avid crafters with a public blog. Click the links, come join us and let the fun begin! Until then, come join us for a hop this weekend Aug 3 and 4!


Kraftie Kre8ations is proud to have this opportunity to introduce its new design team members.  We have a talented group of ladies starting this month.  It's their opportunity to introduce themselves and for us to allow them to truly shine.  Just wait until you see what they have to show you on this hop!

Be there or be square!! Spread the word to all social media pretty please!


La-Vie

Tuesday, July 30, 2013

2013 Creating Keepsakes Convention (CKC) Haul - the sequel...

If you'd like to see my first haul post click here.

Believe it or not, all these purchases (both days) fit into one normal sized re-useable shopping bag!! I bought a lot of little things. I hope you enjoyed all the things I posted yesterday! This post is the final haul post for CKC 2013. I hope you get out to a craft convention. It's pure joy! Ok, let's get to it!! Remember to click on the pics to make them bigger. Links for each retailer (that sells online) are included under the picture.


I nearly passed out at the register when I saw all the prima dolls!!! Buy 5 get one free and 30% off my entire purchase in the first hour of the show!! SCORE!! I got prima flowers, plenty of little stamps, color me card toppers, Leeza Gibbons scrapbooking supplies - very impressed. Among other things.

Strictly Scrapbooking

This brought me right back to grade school! So I figured it would be great to have this protractor stamp on hand for my 2 kiddos!

Jenni Bowlin Studio

I fell in LOVE- LOVE- LOVE with this stuff! It's called diamond mesh. It's ribbon that looks like jewels that can be cut in any shape - even with steel rule dies to crate a one-of-a-kind masterpiece. I also got the flower shaped one that must be cut by hand.

Mon Ami Gabby

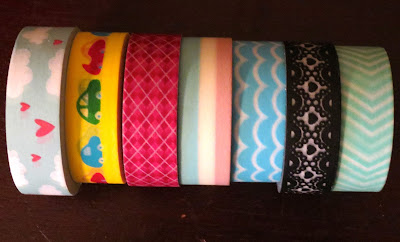
Queen and Company is great for unique washi tape, bling, Disney embellishments and such. It's a must shop booth!
Queen and Company

Washi tape heaven!!! I found all but the chevron on the end there. The one on the end was given to me by VP who was at the event with me. I forget where she got it. Thanks girl!
Love My Tapes

This is the fastest, cutest way to make jewelry! Craft Fantastic offers chains, glass and settings including rings, earrings, pendants etc. You can use their images or your pictures or even cardstock and create a masterpiece in a few mins. I bought some of the kits last year but decided to get some new chains, pendants and such.
Craft Fantastic

I found the other Prima doll and some black plastic mesh for my Disney LO at Scrap-a-Doodle-Doo!! Unfortunately, their website was hacked but they do have a working blog.
Scrap-a-Doodle-Doo


I took an advanced clear cards class from Clear Scraps and it was amazing!! I feel like I only need to take advanced classes at expos from now on. The results were stunning and I will share them with you in the next few days. I got several of their kits, 3D stemple paint, window paint and a detailer tip for my glue. Class goers got a free gift. I picked a tag that is very thick and used for home decor. I think I might make a Christmas ornament out of it. I am thinking about joining their kit of the month club!!

Clear Scraps

Stay tuned this week to see my class projects and guest design team post this week!! I appreciate all your comments!!


La-Vie

Monday, July 29, 2013

2013 Creating Keepsakes Convention (CKC) Haul

LONG post you'll love - enabler alert!!!!

CKC Lancaster was a blast! I got to spend time with my good friend VP and take classes, crop, shop and meet new people! I highly recommend going to a scrapbook expo near you if you've never gone. You gain access to lots of the supplies the big stores don't have. I thought I would share my purchases with you and links to all the online stores so that you can grab some of these precious finds! Click on the pictures to make them larger.

I love Embellish It! for some many reasons. They teach a latest and greatest with basic grey class that's always awesome. Their LO and card kits and clubs are the best I've seen. I was excited to get the Swagger paper line and some cute flairs.

embellish it

My favorite booth to visit is Escape Scrapbooking! The prices and selection are amazing! I bought the most at this booth. It's always my first stop. The owner is so nice. shop early for the best selection! the booth is always mobbed (for good reason!!). I got PA scrapbook paper, OBAMA scrapbook paper, Disney stickers, jolee's stickers, stickles, bling, angry birds, etc. I went CRAZY!! I got a free pink re-usable shopping bag and 12x12 plastic zipper portfolio.


Escape Scrapbooking


At Gary M Berlin I found the newly released stickles colors (6 available)!! Ink for my Stampin' up roller stamps - including an embossing ink cartridge, ultra fine glitter, Darice border embossing folders. I almost bought the BRAND NEW Tim Holtz distress markers (seasonal colors). Next time...

Gary M Berlin


These vintage C'est La Vie Flashcards were callin' my NAME at Melissa Francis!!
Melissa Francis

I took a class called Backgrounds by You and learned how to use ink, spritz, sprays, templates and water to make the most amazing backgrounds on plain white paper. At the booth she had half off deals, African-American baby stickers!! and the cutest Halloween pack called witch hazel by October afternoon. Among other things I purchased! Can't wait to create!
Nicole Petersen Designs


Paper Wizard has THE BEST laser cut titles!! His selection is second to none! There's always a special like buy 4 and get one title free. I always get his titles for that special opening page. Especially for my Disney album I'm working on. I got a couple more Disney titles this time and Bahamas, cruise for our upcoming trip. I thought I'd give crystal stickers a try as well.


My daughter loves when I bring back special goodies for her when I go to the expos. This time I got her a high school musical clear stamp set (she is 8 and she yelled out loud!) and a cool invention to carry her Ipod touch on a lanyard. Its the pink bling item in the upper left pic. For myself... stickers, sticker, stamps, stamps, peeps scrapbook paper!!! Bling headband, jewel ribbon that I can cut and do all kinds of things with. Love the basic grey woolies. they had a whole wall of clearance basic grey. Happy dance!
Scrapping4less


Stamplistic has the most glittery cards - just like the make 'n take I made. The stamp I chose can be cut into several layers and popped up with foam tape. I was glad to find the honey pop ornaments by Inky Antics there. I plan to make ornaments for gifts this holiday season.

Stamplistic 
I hope you enjoyed it! Check back tomorrow for the second haul post!! You won't want to miss it!


La-Vie

Sunday, July 28, 2013

Christmas Tags with Stickles added!!


Thank you everyone for your comments! I got more votes to add stickles to these holiday tags so here they are! 
The holly pops just a little more with the stickles applied. But they both look good to me!


 Rudolph's nose is stamped in red ink, but looks much more festive with stickles added. I like the stickles version best in this case.


Last but not least, the star is colored with a Copic marker on the treetop, but with stickles it really shines. I love the way it sparkles.

I've got lots of crafty fun for you this week. Please check back for my Creative Keepsakes Convention (CKC) haul, CKC class projects, Guest design team post for Crafts Galore and DT blog hop for Kraftie Kre8ations.


La-Vie

Saturday, July 27, 2013

Christmas Tag Trio - Get Inky! Stamps

There's a Birthday/Christmas challenge going on at the Get Inky! Challenge blog. I'm here to inspire...


It's Christmas in July!! I used to really think folks were crazy for thinking about Christmas mid-summer but now I realize it makes a lot of sense. I always have big ideas about making hundreds of cards to send to family and friends but never seem to have the time during the hustle and bustle of the season. I have not sent a Christmas card since 2010! Well this is the year!

I always think about making tags too but never tried it out. Mostly because I struggle with working "small." As you can see, I've thrown caution to the wind and created a Christmas tag trio to help introduce Get Inky! Stamps new holiday stamp set. If you're looking for a versatile holiday set, this is it!


Ok, let's take it tag by tag so you can learn which supplies I used etc.!


Here's the first tag I made using 6 stamps from the set to create a winter scene. The tag was cut from Cricut cart Tags, Bags, Boxes and More 2 (p. 27) at 5." The white DCWV glittered cardstock is the base and the layer is green patterned cardstock by Basic Grey (Marrakech - green tea).

This monochromatic look was created by stamping the trees and sentiments and inking the edges in Forest Moss Distress Ink and coloring with Copics (G85, E37, Y15). To give the star more sparkle, I added yellow Stickles to the star (seen still wet in the top picture). Liquid applique heated with a heat gun gives the snow it's puffy pillowy appearance. What tag is complete without ribbon? The sheer red ribbon from my stash fit the bill 100%.

Here's a closeup to show you just how pillowy the snow is and how beautiful the font is in this stamp set. So sophisticated!


This second tag was cut at 5" using the same Cricut cart (p. 31) but created my own layer by cutting a circle at 3.25" from the Cricut Essentials cart. The patterned paper is from a Christmas themed K and Co. Designer mat pad. Using 4 different stamps from the set to celebrate Rudolph the red-nosed reindeer. I love the bubble letter-ish font! I simulated snow with flowersoft this time. Popped-up felt poinsettias from Jo-ann's and 12mm flower cabochons (The Jewelry Shoppe) added to the center were the perfect adornment. Black American Crafts ribbon with the reindeer's names on it and Martha Stewart snowflake ribbon complete the look.

The red ink for the sentiment and Rudolph's nose is from TPC Studios, Clearly Better - Scarlet. Rudolph was stamped in Clear and Simple Stamps Espresso your Style hybrid ink and traced in Copic 100 black. All edges were inked with Faded Jeans Distress Ink.

Do you think I should add Christmas Red stickles to Rudolph's nose???


This final tag is simple, yet impactful. The tag was cut at 5" from the same cart (p.40) with a layer cut from Cricut Essentials at 2.5" from the same K and Co mat pad. Two stamps were from the Get Inky! set were used. Noel was heat embossed using VersaMark and Stampendous gold detail embossing powder. The holly was stamped in Encore Ultimate Metallic gold ink and heat embossed with the same detail embossing powder. American crafts Christmas ribbon was used on both ends of the tag to tie the overall look together.

Do you think I should add Christmas Red stickles to holly berries???


Once I get your answers I will do a follow up post with new pics (if needed). I hope you enjoyed this holiday post and will consider entering the challenge and buying the stamps on the website or on Etsy!


Update: Stickles added - check it out here!

Challenges:
D.L Art - Anything goes
Pin and Tack - Anything goes
D.L Art - Christmas in July
Sentimental Sundays  - Christmas in July
HIMCR - Christmas in July
Clearly iStamp - Christmas in July


La-Vie

Wednesday, July 24, 2013

Decorated Halloween Envelope


I know, I know... summer is not over yet, but I am gearing up to make Halloween cards for Operation Write Home, a challenge I organized for my favorite Facebook group Kraftie Kre8ations (KK8)! When lo and behold, a timed challenge was introduced... we had to decorate an envelope and post it within 2 hours. So I decided to create a Halloween themed envelope. I love how it came out in only 30 mins!!

It's funny how a timed challenges gets the creative juices going! We have all kinds of fun events, swaps, games, and I have just been awarded a spot on their DT, so you'll hear a lot more about me and KK8 in the future. I help administrate the group, so leave me a message below if you'd like to join! We'd love to have you.


I started out with a neon orange envelope from Staples. It measures 6.5" x 4.75" so it's larger than an A2. I used Jolee's dimensional stickers (pumpkins, spooky), washi tape from Recollections, Copic multiliner to draw the return address lines and a single stamp from Stamps of Life - Postage2Stamp and several from the Fiskars set called Halloween Night. Using the masking technique I was able to stamp the cat behind the area for the postage stamp. I love the sticky all over Post-it notes for this technique. It was easy to cut all the grooves with my Elizabeth Crafts fussy cut scissors as well. But by farm the star of the show was Martha Stewart's glow in the dark glitter. Yes folks, this envelope GLOWS IN THE DARK.

Now for the flap, I decided to use 2 more stamps from the Fiskars set and some more washi tape. I stamped all images in Ranger Archival ink in black. Coloring for the candy corn was done with Copics (100 and YR07). I don't usually decorate my envelopes...but I will from now on!!! Thanks for stopping by!

Challenges
DL.Art - ATG


La-Vie

Monday, July 22, 2013

Cruise Countdown Calendar


I was so inspired by the roadtrip countdown calendar posted by Elizabeth at 217 Creations (click the link to see her calendar) that I decided to make one for our family vacation. It took me several months but the kids and I made it today and it came out super cute!! I did all the cutting and my daughter did all the adhesive and assembly. My son supported us by keeping us company, watching and cheering for Cricut, peeling off the larger pieces of cardstock from the mat and helping to place embellishments.


Supplies:

  • Pack your Bags Cricut cart - ship and layers p. 24 cut at 5.25" and Family vacation title pg. 33 cut @ 2.50"
  • Xyron 5.5", 2.5", 1"
  • Base - Bazzill light blue cardstock -  I cut a few inches off the top of a 12 x 12 sheet, inked with Tim Holtz distress ink - Faded Jeans
  • Blue layer of the boat - Core'dinations sanded with Tim Holtz sanding tool and inked with Tim Holtz distress ink - Faded Jeans
  • Beige and magenta layers - Bazzill
  • Yellow glitter layers - DCWV
  • Black layer, DCWV all chalked up (neutrals) chalkboard mat stack. I had to place almost 2 full sheets on the mat to get the whole cut.  
My daughter had a great idea to use a black Zig writer to color the seam between the two pieces of cardstock which lies right before the y in Days. Genius!! I didn't even think of that! I taught her soooo well!
Here's the finished project and it's designers!! Love, Love LOVE my kids and how this came out! My daughter is now the time keeper... counting down to the big day!!


Challenges:
D.L Art - Summer
Great Impressions - Anything goes
D.L Art - Anything goes
Pin and Tack - Anything goes
Creative Fingers - Anything goes
Through the Craftroom Door - Anything goes
Heck of a Challenge - The Sea
The Crafter's Cafe - Anything goes
Hiding in My Craftroom - Freestyle
CAS-ual Fridays - Use a number(s) in your project
Sarah Hamer Designs - Link up Tuesday (anything - even non-craft related - goes)

La-Vie and family!

Friday, July 19, 2013

You're invited to a BAR-BEE-QUE!


Hello! It's my day to post on the Get Inky! Stamps blog. Please pop over and share your love!!!!

Have you heard? Challenge 8: Summer Sun Fun is going on right now at the Get Inky! Stamps challenge blog. I cooked up some inspiration for ya using the Buzzing Bees set. This invite is sure to please! You won't find a better deal/value on stamps anywhere! Buzzing Bees has over 50 stamps for $39.99! Be sure to check it out. I promise you'll never want for another "bee" saying again.

This creation was made with my scraps! I hand cut the card base, the layer and even the ribbon was leftover from a previous project. I'd love to see what you can make with your scraps!

Supplies:
  • Get Inky! Stamps - Buzzing Bees - bee, sentiment, dotted trail
  • Neenah white card stock
  • Red linen cardstock - JoAnn's
  • Border rub on - American Crafts MiniMarks, Sprout accents
  • Hot dog embellishment - Sticky Trims
  • Copic markers - 100, Y00, Y02, Y06, Y15
  • Ink: Perfect Little Black Dress - Clear and Simple Stamps
  • Checkered ribbon from stash
  • Creative Memories corner rounder
  • Scotch ATG

Challenges:

Great Impressions - anything goes
D.L Art - anything goes
Pin and Tack - Anything goes
D.L Art - Summer
Craftin' Desert Divas - Summer
Hiding in My Craft Room - Super Scraps Saturday Challenge


La-Vie


Sunday, July 14, 2013

We're Live! Denami Summer Splash Blog Hop


When: The blog hop starts on July 14th at 6 AM, PST. However, you have until July 15, 2013, 11:59 pm PST, to leave comments on all the blogs (to be eligible for a prize).Why: To be inspired by fun DeNami Design creations and also the chance to win mini shopping sprees on the DeNami Design website!

Prizes: We are giving away THREE $20 gift certificates to our website! We'll be giving away one gift certificate to a random participant (DT members not eligible) and then we'll also be giving away TWO gift certificates to TWO people who comment along the hop!

You should have just come from the lovely Tammy Hobbshowever, if you'd like to start the hop from the beginning, or you get lost along the way, visit the Denami Blog

I love Denami's large chickie stamp! For my project, I decided to make a magic card to show him enjoying some summer fun. Many of you have been asking for a tutorial, so I've included that as well! It's a very fun project and I hope you will give it a try.


Here's the closed card


And here's the way it looks opened!!!

Supplies:
  • Denami large chickie stamp
  • Magic Card kit - The Paper Cut
  • Ink - black Stazon, Clear and Simple Stamps Hybrid ink - Perfect little Black Dress, On the catwalk cream, Espresso your style, Simply bluetiful
  • Washi tape - Recollections
  • Paper Shapers punch
  • Copics - Y06, Y15, Y28, YR04, Y26, R24
  • Sun stamp - Stampendous - Inspired Icons
  • Ice pop and fun in the sun stamps - Stampin' Up! - Sunny Fun
  • Sun glasses stamp - Clear and Simple Stamps - Jet-setter darling 
  • Sand background stamp - Clear and Simple Stamps
  • Sandcastle stamp - stash
  • Yellow patterned cardstock - American crafts Moda Bella Preppy
  • Scotch ATG adhesive, post it notes that are sticky all over for masking
Your next stop on the hop is the talented Stacy M. but stay a while (or come back) to enjoy a step-by-step magic card tutorial.


MAGIC CARD PICTURE TUTORIAL

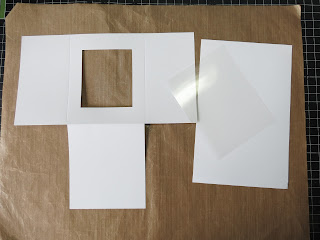
As promised, here is the tutorial!!!! The magic card kit from The Paper Cut provides the card base, envelope, acetate, cardstock (enough to make 8 cards), a slider template and these instructions. FYI - I have taken creative liberties and added my own tips along the way.


Step 1 - stamping the main image on acetate

1. Cut the acetate into 1/4 sheets (4.25 x 5.5")
2. Stamp image on acetate using Stazon ink in the middle of the acetate. Another option is placing the acetate inside the card base window before stamping to make sure your image fits and is centered. Set aside.


Step 2 - Stamping the main image on cardstock

1. Cut 1" off the top of the cardstock creating a 1" x 5.5" strip set aside.
2. Using the same color ink, stamp the same main image on the middle of the cardstock using the most compatible ink for whatever you are coloring your image with. Once the image is stamped, as a test, place the acetate on top and line the images up. It's important that the acetate doesn't hang over the cardstock on any side. Set aside the acetate.
3. Stamp any other images, sentiments or scenery you'd like around the main image (in any ink color) on the cardstock. Using the acetate as a test, make sure all of your images are covered by the acetate. (Anything outside of that will be cut off soon.)
4. Color the image(s).


Step 3 - Attaching the acetate and trimming to size

1. Line up the main image on the acetate with the main image on the cardstock.
2. Turn the acetate over and apply narrow 2 sided tape across the top edge. I used scotch ATG.
3. Carefully attach the acetate to the card stock so that the images align perfectly.
4. Trim along the 4 sides of the acetate with a scissors cutting away the excess cardstock.
5. On the top edge, you will need a pull tab. Using scrap paper punch or a die cut a circle or coordinating shape of your choice. Put adhesive on the lower front portion of the die cut and attach it to the back of the cardstock centering it at the top. Half the circle will stick out above the top edge of the card. You may want to use a strip of cardstock to cover where the adhesive was applied to hold the acetate to the cardstock. I used Washi tape.


Step 4 - Making the Slider and Stop

1. Using the template on the back of the instruction sheet cut a slider using the 1" scrap you cut from the cardstock earlier.
2. With a scrap from what you just cut, create a stop by wrapping a piece of cardstock (approx. 1/4" to 1/3" wide) around the neck of the slider. Wrap it twice forming a flat loop, cut it and secure it to itself with double sided tape. The stop should move freely up and down the slider.


Step 5 - Stamping the frame of the Magic card

1. Open the card flat. Using background stamps, words, etc. stamp the window frame of the card base. DO NOT stamp on anything else - especially the flap below the window. It has to remain blank for the "magic" to happen once the card is assembled!


Step 6 - Assembly - Let's make magic!

1. Turn the card over so that the stamped frame is face down. Place 2 sided tape on the 2 ends of the slider and attach it to Flap C.
2. With the stop at the bottom of the slider, place 2 sided tape just on the stop.
3. While separating the acetate from the cardstock, insert the acetate/cardstock piece with your main image on it onto Flap B. The pull tab will be at the bottom of Flap B and the acetate image should be facing you, but upside down. The rest of the stamped images will be invisible as they are behind Flap B. 
4. Fold Flap B up onto onto the window frame. When you fold it up, look at the front of the card to make sure you can only see the acetate stamped image and that everything is in the right place. NOTE: if the acetate can be seen above the top of the window frame trim a small amount (approx. 1/8" off of Flap B).
5. With the stamped side face down and Flap B folded up onto the window frame and the stop at the bottom of the slider, fold flap C onto Flap B. Apply gentle pressure to the area of the Stop to make sure it adheres to the back of flap B.
6. Apply 2 sided tape to the edge of Flap A. Fold Flap A onto Flaps B and C. Voila! Turn your card over and gently pull up on the tab to reveal the magic!!!


Super cool right? Click here to see another magic card (my first) that I made for 4th of July.


Challenges:

Sarah Hamer Designs - Anything goes
Clearly iStamp - Summertime
Great Impressions - anything goes
D.L Art - anything goes
The Crafting Cafe - Summer's here
Pin and Tack - Anything goes
2 Creative Chicks - 3D
D.L Art - Summer


La-Vie