Showing posts with label Darcie's LLC. Show all posts

Thursday, April 9, 2015

Baby Girl Shaker Card


I'm back with two more shaker cards! These also were made with supplies from Die Cuts with A View (DCWV), Martha Stewart, Marvy, Darcie's, Impression Obsession, Bazzill, Marvy, Recollections and Memento with the addition of Mon Ami Gabby.

Here's a shaker card tip. Notice that the card on the left is more orderly and the one on the right has glitter all over the window. Well, I rubbed the surface of the one of the left with a new drier sheet before filling and it removed the static. Amazing!!


The shaker windows are self-adhesive, very shallow and easy to use. I stuck the adhesive edge of the shaker window to a large punched circle and covered the edge with adhesive fabric ribbon. The windows are filled with iridescent shaped glitter from Martha Stewart. It looks like tiny sequins.

I love the pink crepe paper on the card front from Mon Ami Gabby and the bling from Recollections. The sentiment on the front was created with two stamps from Inkadinkado. I did a little masking to stamp just the baby head and then the baby girl right underneath.


The internal sentiments are from Darcie's and Inkadinkado. Thanks for stopping by!

La-Vie

Challenges:


Please follow me on social media and help spread the word about me.
Pinterest

Tuesday, April 7, 2015

It's a Boy! Shaker Card


Shaker cards are all the rage and I thought I'd try my hand at some simple ones using supplies from Die Cuts with A View (DCWV), Martha Stewart, Marvy, Impression Obsession, Darcie's, Jolee's, Bazzill, Marvy, Recollections and Memento.


The shaker windows are self-adhesive, very shallow and easy to use. It accommodates a small punched square for the background. The sentiment is from Recollections. I then punched a scalloped square and punched a square out of the middle to create a frame. This frame covered the edges of the shaker window for a neat and clean card front. The windows are filled with iridescent shaped glitter from Martha Stewart. It looks like tiny sequins.


The sentiments are from Darcie's. They are the cutest baby sentiments I've seen in a long time. Thanks for stopping by!

La-Vie

Challenges:


Please follow me on social media and help spread the word about me.
Pinterest

Sunday, November 30, 2014

Day 7 (of 12) Days of Christmas - Christmas Ladies

It's day seven of the Honeybearz Designs Annual 12 Days of Christmas Blog Hop!! 

I will continue to post a new project daily (for a total of 12 days) along with many talented bloggers and guest designers. 


What's in it for you? Well... boundless inspiration, generous craft companies/sponsors and giveaways galore! 


If you've arrived here form Miranda's blog you're in the right place! If not please feel free to start from the beginning of the hop by clicking here.

Comment on all the blogs in the hop to be entered to win some amazing blog candy from our sponsors and me! Check out my sidebar for the complete list of sponsors. And for a chance at a crafty grab bag of goodies from me, follow me on all social media. Leave me another comment telling me where you followed me and your username so I can follow you back. Here are my links:
  1. Pinterest
  2. Instagram
  3. YouTube
  4. Facebook
  5. Twitter
  6. Follow me on blogger or Bloglovin - links on my sidebar.

True story!! I am addicted to outline stickers. I have a stack at least 5 inches high and this is the first project I have made since I started collecting them so long ago. I bought them specifically to create my own glitter paper and to shade with Copics.

A few notes - Copics nibs can be ruined by glitter so I lay (dab) on the color with the side of the brush tip rather than coloring the nornal way. I also keep a colorless blender just for glitter. The blender really does blend as well as erase when used with glitter.


I also collect embossing folders. These three had never been used before for projects. Let's not even talk about how long I have been collecting dies and just started using them. I hoard... 

These elements came together like butter! The more intense part was coloring and shading. I just love these ladies! It's rare but I only got one of these sheets. I try to get at least 2 because mistakes do happen...

Here's a close up of each an the internal sentiments I used. All the related info is included in the supply list. But feel free to leave me questions in the comments section if you'd like to know more.


Supplies: 


·       DCWV metallic cardstock – red, textured cardstock - red
·       Bazzill - blue, white cardstock
·       Embossing folders – Sizzix/Tim Holtz Alterations: Holiday Print and holiday words,      Cuttlebug: Season’s Greetings
·       Memento Ink – Bahama Blue
·       Spellbinders Nestibilites die – lacey circles, Tool ‘n one
·       Sookwang tape
·       Elizabeth crafts silk microfine glitter – warm diamond
·       Elizabeth crafts black outline stickers - Jackie's Christmas Dolls
·       Recollections cardstock – white
·       Hot off the Press – Jewel Dazzles
·       Copics – see pics
·       The Stamps of Life – lights4christmas

·       Darcie’s – Eskimo Kisses


Thanks for hopping by! Don't forget to leave me a nice comment to be entered into the drawings. Good luck and please hop next to Sandy's blog!!


The entire lineup for today is:
Guest Designer -Mary http://www.cardztv.blogspot.com/

2. Scrappin Madge ~ www.thescrappinlounge.com


15. Miranda - www.nanasscrapspot.com/
YOU ARE HERE 16. La-Vie Borde-Perry ~ http://www.cestla-viedesigns.blogspot.com/

Thanks for stopping by! See you tomorrow!! You won't want to miss a thing!!

Join in on the FB invite. Amazingly, there's extra games and giveaways. https://www.facebook.com/events/888469727838902/?ref_dashboard_filter=upcoming

La-Vie

Thursday, February 28, 2013

Eyes Wide Shut Layout Featuring Aidan B.


Introducing my son Aidan!! I've been inspired by all of the Project Life posts I have been seeing lately and decided to do one myself. Well, it doesn't have exactly the same look BUT it uses everyday pics I took with my iPhone that I would have never scrapped. Today I used a sketch provided by Sketchy Friday Challenge blog (see below). It was originally for a card but I used it to make this glorious page. My son (home sick today) cannot stop looking at it, making comments about it and smiling. My work is done!!


One challenge I am entering asked for a layout introducing one of the boys in my life. I though, "who better than my son?" I decided to introduce the most dominant aspects of his personality right now.

I worked to create a Polaroid type of feel by printing 2 pictures on one 4x6 piece of photo paper and then punching out my son's face with a square punch. After I affixed it to white cardstock, I cut the appropriate sized rectangle.

The bottom part of the Polaroid seemed the best place to add a little journaling with a personalized stamp and clear sticker. The remainder of my journaling is done with a glitter pen (Spica at You) but it wasn't showing the glitter. I had to retrace my words to get some sparkle going. I think it gives it a messy yet whimsical look (albeit by accident).


One of the challenges called for Washi Tape so I created a double border with it and included a Washi Tape bow! It helps if you dust the tape with powder to remove the tackiness so the loops won't stick together if they collapse.

The title Eyes wide shut came to me because it seems like my son always wants to close his eyes or change up what he's doing as soon as I whip out the camera or video camera. The pictures focus on his eyes so it seemed to be a fitting title.

Yet another challenge called for lots of layers. I tried to bring that across subtly with the 5 layers of cardstock, layered pictures and Washi Tape while staying within the sketch provided.
 
Here's another view of my layout along with the original sketch. 


Supplies:
  • Cardstock: Kraft: Recollections, brown: Bazzill, striped: Darcie's Country Folk, blue patterned: from stash, gold foil cardstock: American Crafts, White: The Paper Cut
  • Cricut carts: Batman , font, shift: Talk bubble cut at 11.59" (using fit to page function)
  • Alphas: Thickers: Patterned Fabric Stickers
  • Embellishments: Eyes: Jolee's Boutique, Smiley face: Recollections
  • Stamp: Aidan stamp from Corry's Cool Stuff
  • Ink: Colorbox Chalk ink: burnt sienna
  • Washi tape: Brown: Tim Holtz, Circles: Queen and Co.
  • Pen: Spica by You glitter pen (Copics)
  • Punch: Marvy 3.5" square punch

Have you guessed? I'm on a roll with entering challenges. Some have a deadline of today, Feb. 28, 2013 and others on March 2nd. Please visit each challenge blog and consider joining me in the next challenges! It's a way to break through those moments of scrap block and to meet new crafty friends.
  1. About A Boy Challenge Blog - Introducing!
  2. The Paper Girls - Challenge #26 Washi Tape
  3. Sketchy Friday - Challenge 8 and check out the cool Digis at SKdigis blog.
 
La-Vie

Monday, May 9, 2011

Challenge #4 - MPS National Scrapbook Day

National Scrapbook Day #4 - make a mother's day themed project
http://www.mypinkstamper.com/2011/05/national-scrapbook-day-challenge-4.html


This card is made from my new favorite Cricut Cartridge Damask Decor. The card is on page 58 and was cut at 6.25" with my Cricut Expression 2. The sentiment and layers were cut from Celebrate with Flourish Cricut Lite Cartridge at 1.5". The card is made from Bazzill basics cardstock. The layer is made from patterened paper from Darcie's LLC. I love the patterned paper because it's approximately 12" x 18" long with a small white border. The stamps used on the inside of the card and from Art Gone Wild! and the ink used was Simply Blue Tiful Hybrid ink from Clear & Simple Stamps.The ribbon is from my stash. This card was used for Mother's Day cards for my friends and family.

La-Vie

Saturday, April 23, 2011

Provo Craft Birthday Layout Challenge - Cricut 5th Anniversary


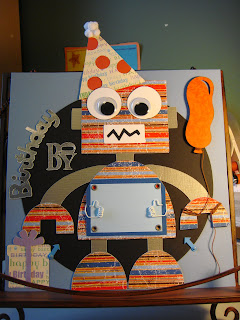
I am excited to share my second layout submitted to the contest. It is a challenge for me to do boy layouts because I started scrapbooking for my daughter. This Birthday Boy layout is my greatest page yet! The robot is cut from the Boys will be Boys Cricut cartridge - pg 64. I used the fit-to-page button which cut at 11 1/4". Die Cuts With A View - the Metallic Stack (silver). The black layer is cut from the same cartridge at 10 1/2". The robot's clothes are cut from stripped paper from Darcie's Country Folk.

Recipe

  • The base layer is blue bazzill premium cardstock
  • The eyes of the robot are made of white Bazzill premium cardstock and large google eyes from Hobby Lobby
  • The gift is cut at 3" from Create A Critter cartridge pg 27 from Die Cuts With A View paper. It was cut with the real size dial on.
  • Birthday - cut from American Crafts foil cardstock and Create A Critter cartridge pg. 27. Boy is cut at 1 1/2" from Graphically Speaking Cricut cartridge pg 41 with the jumbled button on.
  • The mats on the robot's body are cut from Die Cuts With A View safari kids matstack
  • Balloon and Party hat layer are cut from Create A Critter at 5"
  • eyelets, white paper clips, blue brads and metal arrows, brown twine and white wired pompom ribbon are from my stash
La-Vie