Wednesday, January 30, 2013

Authentique January Sketch Challenge Submission


A (blogless) friend of mine, Christine, made this gorgeous layout as her submission to the Authentique January Sketch Challenge. Check it out by clicking here. This is the first craft challenge she has ever participated in and we are both so excited!! She's a big fan of Authentique. Especially their "Carefree" collection used in this 1st Birthday layout. The look wasn't complete until she added some bling (Prima crystals).


Wish her luck!


La-Vie

Wednesday, January 16, 2013

Sandy Hook Ele. Snowflakes (post 4)

Happy Birthday to my 8 year old daughter Zora!!
 
 
Here are the final Sandy Hook Ele. snowflakes. Together with my past 3 posts they show a complete set. I'm hoping these flakes bring them joy.
 
This set of snowflakes really made great templates (masks) once it was cut out using the fit to page function. Now I can use chalk, spray ink, ink pads etc. to create this snowflake pattern on 12x12 paper for a layout. I'm going to do it too. You'll see my post later in the month. I'm determined to try every tool and concept I have in my craft room this year. You wouldn't believe what I've had for 2 or 3 years and have never even opened. Anyhoo, I digress...


Cricut Cartridge Graphically Speaking - I made this one double sided using DCWV glitter cardstock.


Both of the above are from Cricut Cartridge Joys of the Season using Bazzill cardstock.


And the final two are from Cricut Cartridge Sophie. The black and white is from DCWV (all dressed up stack? Don't quote me...)


La-Vie

Tuesday, January 15, 2013

Sandy Hook Ele. Snowflakes (post 3)

 
My crafty charitable donations were kicked off this year with these snowflakes for Sandy Hook Ele. in CT. There will be 4 posts in all to share the different types me and my 2nd grader made to cheer up the survivors and create a winter wonderland in the school along with children and families across the country. The National PTA was instrumental in getting the word out and mobilizing this effort.


These 3 snowflakes were cut from Cricut Cartridge Pooh and Friends. The cardstock is pink DCWV glitter cardstock and the snowflakes are double-sided. The circle is the negative cut and the positive cut (shown below) remained. Waste not, want not!


The next snowflake is double-sided but a little differently. The main image was cut from DCWV white glitter cardstock (silver glitter) and the back side is plain white. Using the same cardstock but in pink with the silver glitter I cut the layer for the snowflake correctly on the top image and too small on the bottom (but I went with it anyway...no need to waste it. Every snowflake is unique!)


Last post of snowflakes next time... stay tuned.
 
 
La-Vie

Monday, January 14, 2013

Sandy Hook Ele. Snowflakes (post 2)

Here are some double-sided snowflakes we made for Sandy Hook Ele. in CT to help create a winter wonderland in their new school. It's a nationwide PTA project in schools and homes in support of the survivors.
 
 
The first two snowflakes are cut from Cricut Cartridge A Child's Year and DCWV Glitter cardstock. In order to make the snowflakes double sided (for hanging from the ceiling or placing in windows) I used the flip feature to make sure all the facets matched up. Even with using flip, the pieces only fit together perfectly one way. It was a challenge getting them lined up and stuck together with terrifically tacky tape and zots glue dots.


This next one is one of my favs from Damask Decor. It's a tag so it already had a nice hold for hanging in it. Although the camera angle doesn't show it well, the white cardstock and silver glitter from DCWV is brilliant.


This one cut from Designer's calendar and American Crafts foil cardstock in hot pink, looks like a hand cut snowflake like the kids make in school.
 
 
Check back for more snowflakes...
 
 
La-Vie

Sunday, January 13, 2013

Sandy Hook Ele. Snowfalkes (post 1)

 
When a tragedy like the one at Sandy Hook Ele. in CT happens it's so shocking and unbelievable. It touched me deep in my soul. I wanted to do something to help and I wanted my daughter (a 2nd grader) to help. I didn't know what to do. I felt helpless. My heart soared when the national PTA put out a call for schools and families to make snowflakes to create a winter wonderland atmosphere for the children when they returned to a new school in January 2013. I knew that was something we could do. I felt good knowing we could bring a smile to the children and faculty's faces.
 
My daughter operated my original expression while I manned the E2 and Imagine. It was exciting.
 
 
Surprisingly, Cricut has many, many unique snowflakes to cut across multiple cartridges. The snowflakes I am revealing today are from an oldy but goody - Speaking of Winter. This particular snowflake is a tag. A snowball tag that makes an "S" for Sandy Hook. I liked it because it already has the hole to hang it from. Using the fit to page option the tag was cut at over 11" which was perfect.


Here's another tag with a mitten cut outs. I used patterened paper from my purge box. It's a great way to whittle down the stash in the most satisfying way!
 
 
I loved this one because it's a snowflake inside of a snowflake. These cuts provide 2 extras - scraps that are beautiful shapes and a mask to use spray colors with to make my own snowflake patterned paper.


My next few posts will be show more of the snowflakes. Love is in the details....


La-Vie

Saturday, January 12, 2013

Hot Pink, Black and White Damask Embellished letters

 
Embellished wooden letters have fast become a best seller at C'est La-Vie Designs Unlimited, LLC! A month hasn't gone by without an order for these babies! These letters can stand on their own and/or be hung on the wall. This time, the order was for Hot Pink, Black and White Damask for a baby shower and nursery decor. I used my fav new technique of coloring the hot pink portions with my Fuschia copic sketch marker. That's right! I colored everything (except the ribbon). I love the ease of creating a coordinated look by hand coloring your own embellishements.
 
Supplies:
 
~wooden letters from Hobby Lobby
~Black and white Damask - Printed from Cricut Image Teresa Collins Black and White
~Fuschia Copic Sketch marker
~Bling, chipboard boarder, fluffy flower from my stash (bling added to center to create a new embellishment)
~Hot pink Damask ribbon from Hobby Lobby
~mod podge, teriffically tacky tape


La-Vie

Friday, January 11, 2013

KISS - Valentine's Day Layout

 
KISS - Keep it Simple...well you know...
 
Sometimes I'm in a rush, or I've lost the scrapbooking ju-ju etc and need a quick go to layout. This particular day I needed to make a Vday layout quickly. I happened upon a small kit of Nikki Sivils Scrapbooker - Sugar Cookie Collection that I got at a scrapbook convention (CKC I believe). It included double sided cardstock in rich colors and patterns as well as coordinating die cuts, stickers and alphas. Since the pics are the stars anyway in a layout, I decided to put aside my Cricut and slap this baby together.


The only thing I didn't use from the kit were the photo mats and the vellum title (You are my everything) which as DCWV. I love it came out. The layout is for a friend's baby girl who was born healthy and happy this month!! The baby's first Valentine's Day pics will pop on this layout and be super duper cute. 


Have you had a KISS moment? Tell me about it... I'm all ears!
 
 
La-Vie

Thursday, January 10, 2013

Baby Milestone Charts - Instant Scrapbook


I've had a stack of glitter nursery rhyme cardstock from Jo-Ann's fabrics for some years now. I thought it would great to use the mother goose pages as a background for these growth charts. Using archival printer paper, I created in word 3 lists that are seen in a traditional baby book. One to chart weight and height, another of the memorable firsts and yet another of solid foods introduced and how they were tolerated.


This tooth chart was found on the Internet and enhanced with the lines to include when those particular teeth came in (at how many months). I love this vellum title from DCWV. Using a strip of glitter paper behind gave it just the shimmer it needed! The tape measure was cut from 9 months and I decided to hand write the numbers since the cut ones were beyond tiny.


Another sihoutte from A Child's Year (Cricut) really compliments the companion page. Thickers in green glitter create the title for the top chart. And I couldn't resist the parade of plate, cup and utensils from Criuct Image Cartridge Kate's Kitchen for the food chart. Here are some more views:


My client asked for this new concept. At first I didn't hear. Now it's going to be a part of my instant scrapbook line up. Sometimes it's best to step out of the norm and try to fulfill a new request. I'm glad I did!
 

La-Vie

Wednesday, January 9, 2013

1st Birthday Boy Layout - Instant Scrapbook


This is a first birthday layout included in an instant scrapbook I created for a client. It was inspired by an email I received from Embellish It! that included lots of rectangles to bring across a theme.


I started with scrapbook paper from my stash with a bithday theme and added chipboard stickers, 3D embellishments, patterned paper from my scraps bin, Alphas from Thickers. The wavy paper is from Provo Craft.


I decided to round some of the corners with my Creative memories corner rounder and use the Birthday themed cardstock elements. I have no idea of the paper line. But I did get in a class at CKC. A perfect layout without even turning on the Cricut! I love it!


La-Vie

Tuesday, January 8, 2013

DCWV July 4th Scrapbook Page


I love Die Cuts With A View (DCWV)! The base page does most of the work, which is important when you only have one page to exemplify a theme. It's from the Summer Days Stack. Coupled with Bazzill mats, Cuttlebug embossing, a die cut and sticker accents the page came together fast.

 
The patriotic die cut is from Cricut Cartidge A Child's Year. The red mat is from my stash. It is linen so it takes the embossing so well. I love the additional dimension in the Cuttlebug stars folder. All the mats were hand cut and rounded with my Creative Memories corner rounder - the best on the martjer in my opinion. Oh, and the glitter stickers are from Sticko (EK Success).


I am in love with these 3D sticker embellishments called Twinkling Goosebumps from Queen & Company. They fit the design perfectly! I'm feeling patriotic. I can't wait for warmer weather. How about you?
 

La-Vie

Monday, January 7, 2013

Happy Easter Scrapbook Page


Here's a quick post for ya! I love having lots of space on a 2 page layout to bring across a theme. But sometimes my clients want to pack in all the holidays without adding extra pages. In that case, we go to a single scrapbook page. Without lots of space, you've got to hit it and quit it sometimes!! I love for the pictures and journaling to be the star of the page rather than the design. In that vein, I created this simple Easter layout to highlight Baby's first Easter.

All my Cricut cuts came from Easter 2010. The little egg embellishements are from Recollections. Cardstock from American Crafts, Bazzill and Core'dinations along with a patterened paper circle from Making Memories.

La-Vie

Sunday, January 6, 2013

Nursery Layout for Baby Boy- Instant Scrapbook


This layout is part of an instant baby boy scrapbook I made for a client. The book is designed to document the baby's first year. This particular layout highlights coming home from the hospital and pictures of the nursery.

The idea for this layout started with Making Memories Animal Crackers - Jack Flocked Alpha scrapbook paper. I don't usually use paper to scrapbook with (only cardstock and thicker materials) but I just loved the look this paper and the flocked letters. It was perfect for this baby boy's scrapbook.


Because the background is busy I decided to go light on embellishments. A few significant ones from my stash was all it took.


I am still excited about these embellishments I created with the Cricut Cartridge 9 Months! The mobile title and the crib were must have elements. I got this cart on Black Friday and it was inexpensive and very valuable.


I added a sticker star to the mobile to give it my own touch and this 3D bear sticker. I really wanted this bear in the crib but he was too big (waaaahhh!) But I am pleased with his location now. It gives the title that little somethin' somethin' I was looking for.


I love Core'dinations cardstock! It really gave me the look I wanted here for the crib sheet. This a=is a one of a kind layout that brings me JOY!


La-Vie

Saturday, January 5, 2013

We're Pregnant! Layout - Instant Baby Scrapbook


I've got the spark! While working for a client to create an instant scrapbook for a baby boy, I have expeienced some of my most creative moments this year. I attribute it to the calm I feel about my craft organization. I can view and find everything because I use the ScrapRack and the 4 section system for organizing everything taught by Tiffany Spaulding (creator of the ScrapRack).


This pregnancy layout starts with My Mind's Eye - Wild Asparagus cardstock and blue distressed frames. Using the Cricut Cartridge 9 Months I created this entire layout. The lady, the titles the untrasound graphic. It's a go to cart for pregnancy and baby. On the ultrasound embellishment, I used Copic markers to color in the baby. The hearts are from a valentines set of puffy alphas I got in the $ section at walmart some years ago.


These are the cutest titles I have seen for this cut from 9 Months. Instead of layering some of the pieces, I cut everything out in white Bazill basics cardstock, left it on the mat and used copics to color in the sections I needed. I even did that for the layered pieces. Great time saver! I was able to quickly color the images, going outside the lines, to give it a completely covered look. I am in love with glitter cardstock from DCWV! I had to add some bling - boy book or not!


La-Vie

Friday, January 4, 2013

The Fine Art of Scraplifting - Baby Milestones Layout


Ok, I hope you enjoyed the trip down memory lane this past month while I shared all the projects I created (and then made my own) at CKC events. It's time to start showing my orginal designs again. So it's all me now! LOL.

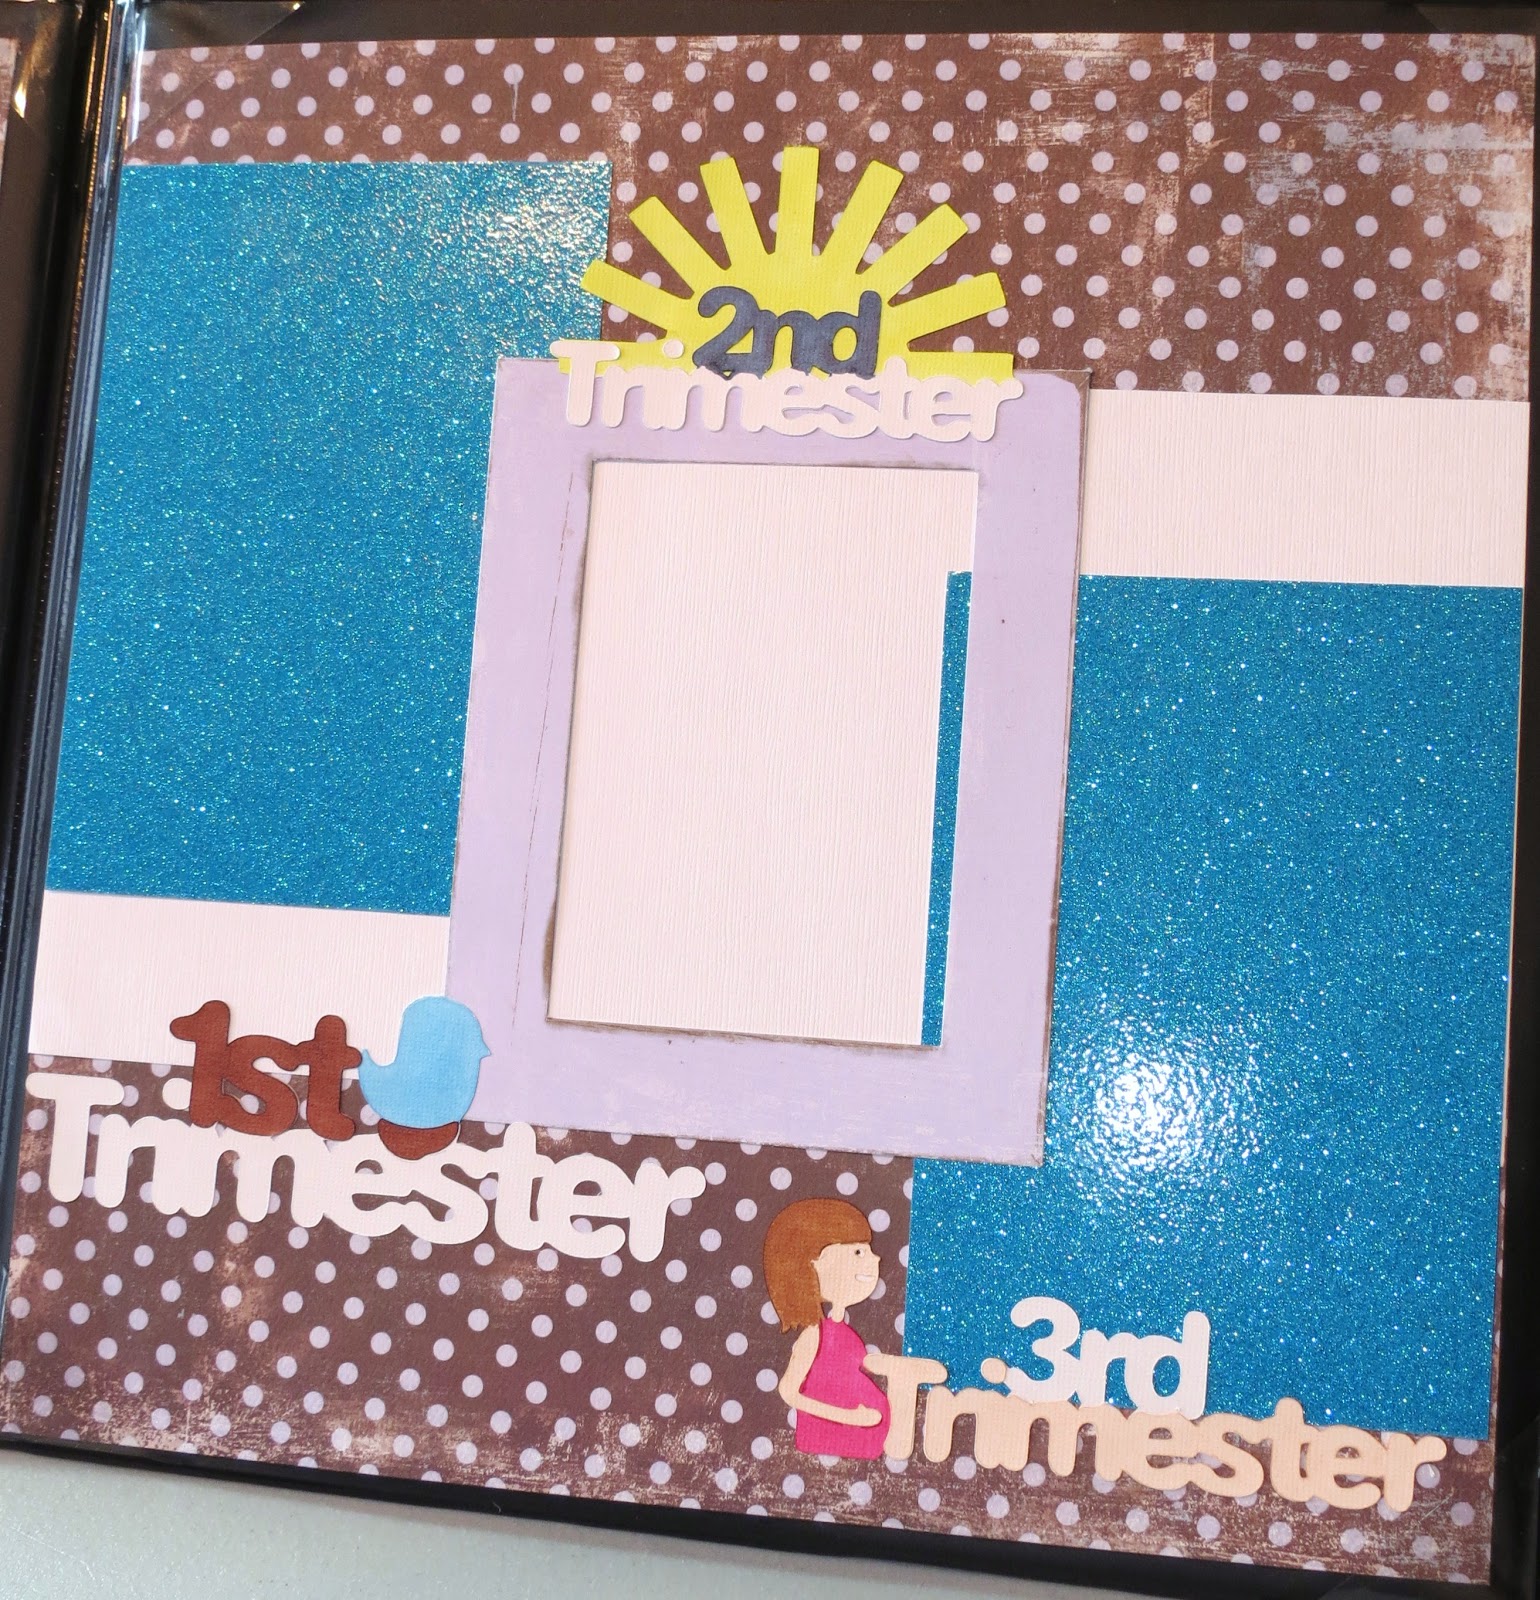
I love to be inspired by other crafters on Pinterest or other sites. You never know when inspiration will hit. I caught FIRE when I received an email with a milestones layout (shown at the bottom of the post - wish I could rember where it originated) as I was working on an instant scrapbook for baby's first year and was looking for a fresh new way to show milestones. I scraplifted the sketch and made it my own. I am VERY VERY excited and pleased with the results. I encourage you to scraplift something you see me or someone else making today!


I kept the major aspects of the layout with the vertical strips and the accents going across the page. I expect that the family that received this book will alternate the pictures and hand written journaling as shown in the inspiration layout. However, the layout that inspired me was for a girl, so I need to transform it to a boy layout. I did so with the color pallate, font and the use of stars instead of scallop circles.


The page covers Baby's first smile, first bath and first tooth.
  • Font - Cricut Cartridge Mickey Font
  • Embossing - Cuttlebug Word Collage
  • Smiley Face button - Recollections
  • Bath silhouette, Tooth - Cricut Cartridge A Child's Year
  • Striped cardstock - My Mind's Eye - Wild Asparagus


This page covers the first solid foods, Crawling and Walking. Additional supplies include:
  • Bib/Peas - Cricut Image Cartridge Nursery Tails
  • Crawling baby - Cricut Cartridge New Arrival
  • Walking silhouette - Cricut Cartridge A Child's Year - note: this cut included a beach bucket in the left hand of the child. I cut it off by hand to acheive the look I needed.
Here's some close ups....


Here's where my inspiration began!
If you love it, let me know! If you have scraplifting tips, share 'em! Thanks for stopping by.


La-Vie