Showing posts with label Prima Marketing. Show all posts

Saturday, August 1, 2015

Lil Patch of Crafty Friends - Challenge 15: Anything Goes!


It's the start of another (always) anything goes challenge at the Lil Patch of Crafty Friends challenge blog.  I hope you'll enter up to 3 entries. But guess what? You now can enter an unlimited number of other challenges! I can't wait to see what you create!

There's three sponsors for this bi-weekly challenge. They're offering some great prizes!

Faery Ink -  Prize: 3 Images


 Bugaboo Stamps - Prize: 7 Images 


Imagine That! Digis...by Kris - Prize: $10 Gift Certificate
************************************************************
I chose Bugaboo Stamps - Chibi Elsa to design with. Frozen has been the most epic Disney movie in recent times. I figured I could present you with a little "let it go" action - the movie's most popular song. 


I've had the most trouble wrapping my head around water coloring. I have watched many videos of people enjoying the randomness and such. I have tried a few times to no avail. But I am much too regimented and don't enjoy that look. 


Last week I watched a YouTube video by Jenny McGuire using a Wink of Stella clear pen instead of water on a brush to blend colored pencils. It looked easy and was more controlled. That inspired me to challenge myself to give it another try using my new set of water color pencils by Prima Marketing and Wink of Stella to color Chibi Elsa. 

Wow! I really love the results. I have a way to go in terms of determining how much color and how much water etc. But I really think I have found a way to incorporate water coloring into my repertoire. The best thing I learned is to use a water brush for any skin. The shimmer from the Wink of Stella makes faces look dirty and weird.


Supplies:
  • Digital stamp - Chibi Elsa by Bugaboo Stamps
  • 5x7” card base (stash)
  • Tim Holtz - distressed water color cardstock, stormy sky distress ink
  • EZ Runner - scrapbook adhesives
  • Xyron cheetah 2 adhesive
  • layered snowflakes - La Petites by The paper Studio
  • Epoxy snowflake - Recollections
  • Fine point water brush (stash)
  • White glitter font chipboard stickers - Thickers by American crafts
  • Snowflake punch around the page - Martha Stewart
  • Wink of Stella clear brush pen
  • Snowflake patterned paper - O Christmas Tree by Recollections
  • Prima watercolor pencils - 03, 88, 89, 107, 114
  • Loew-cornell water color pencils - magenta, cerulean blue, medium blue


Challenges:

Please follow me on social media and help spread the word about me.
Pinterest

Monday, May 18, 2015

Disney's The Little Mermaid Scrapbook Layout


Every now and again I love using a kit when my mojo is low. This Disney's The Little Mermaid layout started as a Mosaic Moments kit with all of the pre-cut squares, ribbon and cornerstones. Since it was a sea theme, I thought it would be great for the picture of my family, Ariel and Eric. This was my daughter's favorite princess at the time. It was so magical for her to meet her and Eric. They were so attentive and in character. It was truly amazing!


In order to complete the layout I added some die cuts using my Cricut Explore and a Disney cartridge. Disney characters have SO many LAYERS!! I'm happy with how Ariel came out, the title and the name shell. To add a little sparkle and shine I added star gem embellishments by Prima.


Here's the layout altogether. Thanks for stopping by!


La-Vie


To view more of my Disney pages check out these links:

http://cestla-viedesigns.blogspot.com/2015/05/princess-jazmine-and-aladdin-layout.html

Challenges:


Please follow me on social media and help spread the word about me.
Pinterest


Saturday, May 2, 2015

It's National Scrapbooking Day!! And today starts the countdown to Mother's Day!!


Happy National Scrapbooking Day! I hope you'll be entering challenges and singing up for giveaways and shopping for all those crafty goodies today!

I have started the countdown to Mother's Day today and wanted to share some cards for the occasion all week. Don't forget to stop back to see everything! Or subscribe and you won't miss a thing!

I'm crazy for Hot off the Press these days! Here's one of their color me card toppers. It is beautifully designed to take any color medium you love. I got busy with Gelatos and Wink of Stella.


After coloring I used a chipboard dimensional Mom sticker from my stash and a flower from Prima and bling/pearls from Recollections. The inside of the American Crafts card base was lined with text weight paper from The Paper Cut. I combined two sentiments - you are the greatest mom is from Clear and Simple Stamps and the other sentiment is from my stash. Both were stamped in memento tuxedo black ink.


Thanks for stopping by! Tell me how you are celebrating NSD!

La-Vie

Challenges:


Please follow me on social media and help spread the word about me.
Pinterest

Saturday, March 28, 2015

Create a Card Blog Hop!!!!!!


Welcome to the Create A Card Blog HopWe are so happy you could join us today.  This is a one day blog hop, but don’t worry you have until Monday to stop by all the blogs and leave a comment to be entered into the drawing for the wonderful prize we have for you.


If you started at the beginning of the hop at Scraps by Gracie
you should have arrived here from Pamela's blog.

Catherine Pooler, founder of Stamp Nation and CreativityGrows Here has generously donated a trial membership to Stamp Nation for us to give away to those who hop along with us!!!!


To be entered into the drawing, just comment and follow each of the blogs on the hop today. That's it! It's just that easy! Prizes will be drawn and announced on Theresa's blog Scraps by Gracie on Wed. April 1st - and that's no joke!

But WAIT!!! To sweeten the pot, I also have blog candy of my own. Please comment here, follow my blog with bloglovin or GFC and follow all my social media links found at the bottom of this post to be entered for to win some crafty goodness.

Please leave me your email address in your comment. It will be the only way I can contact you.


*****************************Now on to the project!**********************************

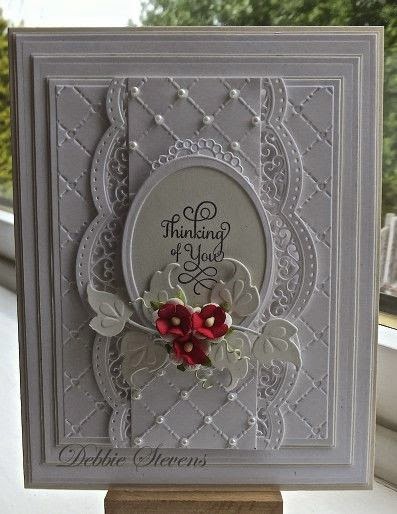
I decided to CASE (copy and share everything) a card from Pinterest. At the end of the post I shared the inspiration and the designer's blog. 


I created two almost identical cards based on the original. I have always been curious about the white on white on WHITE cards. It makes me think... what's up with all the white? But I must say I GET IT now. It's gorgeous...refined... classy...especially for wedding cards.


All the patterned cardstock came from a single SEI stack called white elegance. The cardstock is white with an embossed white pattern. I chose patterns that would blend in and complement each other.


One of the layers is punched with a Martha Stewart punch, the top note is made using Stampin' Up! nesting dies and accented with a punched element on top. A Prima flower and diamond shaped Recollections bling accent the card front.


Just look at all that dimension! But guess what? It can still fit in a normal envelope!!


Our Daily Bread Designs had the most wonderful wedding sentiment - recipe for a happy marriage - and the cake stamp is from Recollections. I used Versafine for the sentiment and Encore metallic ink for the cake. Oh and both of the external sentiments are from Recollections stamped in the same inks.


I bet you didn't notice....for extra flair, the card base and a couple of the layers are made with heavy weight cream shimmer cardstock from my stash. I am very happy with how it came out. Surprisingly, CASEing a card takes much longer than creating one from scratch.

Here's my inspiration by Debbie Stevens of PaperPastimes. I fell in love with the layers and the richness of her creation. 


Please be sure to hop over to all the other wonderful blogs. Here is the entire line-up:


Thanks for hopping by!!!


La-Vie

Challenges:


To be entered for the prize, please follow me on social media and help spread the word about me.

Pinterest


Sunday, January 11, 2015

Masculine Get Well Card


When I heard one of my online crafty friends DH was hospitalized and in need of some cheering up, I offered to send a handmade card. Get Well cards for men (or any card for men) is not my strong point. So I decided to take the pressure off and create something my style and just to have fun with it.  Here's what I came up with.


The A2 woodgrain base is from The Olde Town Market box of cards by The Paper Studio. I then layered scraps of cardstock from my stash. The script one is by Prima Marketing and the other... I don't remember!

My almost 10-year-old daughter helped me choose the gear stamps. I kept chanting... "I need something....MANLY!" In my best, deep, loud superhero voice and she kept me on track.

I tried to use Pinterest for inspiration but I have not pinned many masculine crafts yet and they all seem to have unrelated images with sayings. Why is that? I kept thinking I need something manly but not cutesy and it SO hard to do both with the right sentiment.

Normally I would use an umbrella image with this sentiment but I didn't feel it was manly enough. I'll be working on getting the manly cards right this year.

Supplies:

  • The Olde Town Market box of cards - The Paper Studio
  • Script cardstock - Prima Marketing
  • Yellow cardstock - stash (DCWV?)
  • We R Memory Keepers - Sweetheart inkers - black
  • Inside sentiment - "On the mend" The Stamps of Life
  • Gear, clock and screw stamps - "Get it in Gear" Technique Tuesday
  • External sentiment - "Umbrella4You" The Stamps of Life
  • Tim Holtz Distress ink - frayed burlap
  • Tsukineko - Versafine: Onxy Black
  • Scotch ATG
  • Ranger Multi-matte medium
  • Woodgrain sequins - studio calico
Inquiring minds want to know! How easy/hard it is for you to make manly cards. I'm also looking for tips/advice on how to keep my cards MANLY!! Hit me with your best tip/trick please? Inquiring minds want to know!

Please share my posts on social media. Thanks!

La-Vie


Thursday, September 25, 2014

Stenciled Cami using Prima Marketing Free Spirit


I'm so excited to share my first stenciled cami! I recently watched a video on Prima Marketing's YouTube channel and was inspired to try stenciling on fabric myself. With the Scrapbook Expo coming up and a most creative tee shirt contest arranged by Croppers Delight NYC there was even more reason to create this stenciled cami. Croppers Delight NYC negotiated free and reduced items at many of the booths and you have to show you were part of the group to receive the discounts.


The Free Spirit stencil is 12x12. I used Liquitex Super Heavy Gesso to stencil the image. Then it got interesting... I added my own twist. While wet I sprinkled on Recollections sparkle embossing powder. After allowing it to air dry for some time, I used a heat gun to melt the embossing powder. The glorious sparkly design is amazing! I simply added the group name and my signature and voila!


Supplies:

  • liquitex super heavy gesso
  • Prima Marketing - Bloom Collection by Jaime Dougherty - Free Spirit
  • Tulip stencil spray adhesive (repositionable)
  • Tulip Fabric markers
  • Recollections signature - Sparkle Embossing Powder - Clear silver
  • Nicole Heat tool
  • tee shirt form


Guess who won the contest??? A $25 shopping spree from Mon Ami Gaby??? Me!!!!! I got all kinds of goodies!! Woo hoo!! Here's the owner!


I hope you were inspired!

La-Vie