Showing posts with label Jolee's. Show all posts

Monday, June 29, 2015

Congrats Grad - One sheet wonder


I've got a quick post and a flash back for ya! Remember the Father' day cards I created using the one-sheet-wonder? These cards were part of the set. I used some of the cards to create some country themed graduation cards. Just in case you're new to my blog, here's the template I used. 


My fav parts of these cards are the the Jolee's dimensional stickers and the punched border I created using Martha Stewart's cathedral lace punch. Thanks for stopping by!

La-Vie


Challenges:


Please follow me on social media and help spread the word about me.
Pinterest

Saturday, May 16, 2015

Around the World Blog Hop!!


 Thank you for joining us on the adventure of a lifetime! Pack your bags! Get those passports ready!
We are about to embark on a trip Around the World during this blog hop!


You should have arrived from Alica's blog! 
If you would like to start at the beginning of our tour,
 Connie Can Crop is the first stop on the Around the World blog hop.

This is a one day blog hop and we appreciate your leaving a comment for all of these talented crafters who are here sharing their ideas and creations. We hope that we can inspire you with culture and creations from around the globe.


We have a fantastic sponsor this month, ConnieCanCrop!


She will be giving one lucky winner a $10 gift certificate to spend in one of her online stores!


 What do you need to do to win? Easy... become a follower of each of the fabulous blogs in this hop and leave each of them a comment letting them know what you like best about their projects.

You will have until 12:00 am Monday to finish this hop and leave your comments.


Winners will be announced on Wednesday at Connie Can Crop.


Be sure to follow everyone and leave your blog love along the way!

Your destinations await you! Bon Voyage!

***************************************************************

This destination stop is the Bahamas!! 

My family went on a cruise to the Bahamas in 2013. For the opening page of the scrapbook I created this interactive scrapbook page. The major supplies include Mosaic Moments (dies and grid paper), Flip flaps from Close to My Heart, The Paper Wizard and the scrapbooking kits available on board Carnival cruise line. I was able to fit 3 layouts into one. Life changing....


To start, I attached the adhesive ends of the flip flaps to the top and the bottom of the page protector.  Then I cut 2 pages of 12x12 grid paper in half. I used the first one to showcase the striking title from Paper Wizard and a photo of the water and sky from the beach in Freeport, Bahamas. Using the Mosaic Moments dies I cut the picture into strips and adhered the strips perfectly spaced thanks to the guidelines on the grid paper.

I love when I go on vacation and there's scrapbooks and/or scrapbooking kits available. Carnival had two. I got them both and I used half of a sheet to showcase some journaling and our pre-boarding shot.


Voila! When you open the flaps there's a scrapbook page inside plus the the other side of the flip flaps. The pictures are from the same beach in Freeport using Mosaic Moments and patterned paper (inked with Memento ink) and embellishments from the Carnival kits. I also included some embellishments from my stash. I believe they are from Jolees, Recollections and Jet Setters by Reminisce.

Here's a closeup look at each portion of the layout. The kids had a ball making a sand castle. They didn't have a bucket but their shoes were good enough to transport water!


It was challenging to figure out how to make the aesthetic work with using the flip flaps. But now that I have tried it, I am excited to use them again. My books are going to be so more dynamic now! Thanks for hopping along!

La-Vie
Up next is Jessica!


Here is our complete line up in case you get lost along the way:

1. Connie (Greece)- http://conniecancrop.blogspot.com
2. Madge (Ireland)- www.thescrappinlounge.com

Challenges:

Please follow me on social media and help spread the word about me.
Pinterest

Thursday, April 9, 2015

Baby Girl Shaker Card


I'm back with two more shaker cards! These also were made with supplies from Die Cuts with A View (DCWV), Martha Stewart, Marvy, Darcie's, Impression Obsession, Bazzill, Marvy, Recollections and Memento with the addition of Mon Ami Gabby.

Here's a shaker card tip. Notice that the card on the left is more orderly and the one on the right has glitter all over the window. Well, I rubbed the surface of the one of the left with a new drier sheet before filling and it removed the static. Amazing!!


The shaker windows are self-adhesive, very shallow and easy to use. I stuck the adhesive edge of the shaker window to a large punched circle and covered the edge with adhesive fabric ribbon. The windows are filled with iridescent shaped glitter from Martha Stewart. It looks like tiny sequins.

I love the pink crepe paper on the card front from Mon Ami Gabby and the bling from Recollections. The sentiment on the front was created with two stamps from Inkadinkado. I did a little masking to stamp just the baby head and then the baby girl right underneath.


The internal sentiments are from Darcie's and Inkadinkado. Thanks for stopping by!

La-Vie

Challenges:


Please follow me on social media and help spread the word about me.
Pinterest

Tuesday, April 7, 2015

It's a Boy! Shaker Card


Shaker cards are all the rage and I thought I'd try my hand at some simple ones using supplies from Die Cuts with A View (DCWV), Martha Stewart, Marvy, Impression Obsession, Darcie's, Jolee's, Bazzill, Marvy, Recollections and Memento.


The shaker windows are self-adhesive, very shallow and easy to use. It accommodates a small punched square for the background. The sentiment is from Recollections. I then punched a scalloped square and punched a square out of the middle to create a frame. This frame covered the edges of the shaker window for a neat and clean card front. The windows are filled with iridescent shaped glitter from Martha Stewart. It looks like tiny sequins.


The sentiments are from Darcie's. They are the cutest baby sentiments I've seen in a long time. Thanks for stopping by!

La-Vie

Challenges:


Please follow me on social media and help spread the word about me.
Pinterest

Sunday, November 16, 2014

Christmas Project Life Scrapbooking


My 9-year-old daughter was inspired today to get back to creating her Christmas project life scrapbook for grandma an auntie. If you're just joining us please check out Zora's first four posts - day 1day 2, day 3 and day 4.

She's in the middle of memorializing her second Christmas in 2006. She paper pieced a journaling card at the top right and created her own square snowman scene complete with glitter snowflakes using the Spica pens.


Here's a closer look at that snowy scene! Her creative mojo was in full effect! I love how she knew to ground the image as well. 


The back side of the page showcases her auntie and her gifts. Zora is not afraid of mixing colors and patterns! Ah, to be a kid again!


Thanks for stopping by! Your comments mean the world to my little girl so thanks in advance for them!

We have great news to share! She has been invited to join the (advanced classes) enrichment program at her elementary school. With the assessment she took we now know how she learns, her IQ and are excited to see the academic heights she will ascend to! #PROUDMAMA

La-Vie

Monday, October 20, 2014

2nd Christmas Pocket Scrapbooking Layout


Welcome back to my blog! I'm showcasing the last (for a while) of my 9-year-old daughter's Christmas pocket scrapbooking layouts. She began documenting her 2nd Christmas in rare form! If you're just joining us please check out Zora's first three posts - day 1day 2 and day 3.


Zora used creative journaling and several embellishments to create these pages in her own style. With each layout her personality is emerging more and more. She has less questions for me and is completing them much faster. Mission accomplished!


Here's another example of how to make a custom journaling card using a Christmas tree and snow globe from Jolee's and a snowflake from Recollections. Zora used white cardstock to represent snow with a green background. I love her use of color and pattern.

Thank you to everyone who viewed these posts, left comments and shared comments on FaceBook. It has really encouraged my daughter to keep going and reinforced the idea that she is doing a great job!

La-Vie

Saturday, October 18, 2014

Deck the Halls! Pocket Scrapbooking


Hello there! It's day 3 of the Christmas album reveal. 
If you're just joining us please check out Zora's first two layouts - day 1 and day 2.

Here is the last page of Zora's first Christmas featuring grandma and auntie. In these pictures Zora is in the early stages of walking. I love when children are wobbly but determined to get to steppin'! That toy with the mallet and the balls was one of my daughter's favorites! A lot of noise and fun. Those were the days...

In addition to the Project Life cards and the ones from Paper Studio, Zora created her own card from scratch using can Lawn Fawn cardstock, bling and dimensional embellishments from Jolee's Boutique. I was impressed that she cut out her own snow hills and moon. Awesome, fantastic!


This girl is on fire.... happy happy, joy joy!

If you have children in your life what are some of your fav first Christmas memories?

Thanks for stopping by! Next time I will have 2 more wonderful pages to share from Zora's 2nd Christmas.

La-Vie

Monday, September 15, 2014

Amusement Park Scrapbook Page - September Guest Designer - Scrapstuffz


Happy Monday!!!


I'm super excited to guest design for the Scrapstuffz "Inspired By" Challenge blog for a 2nd time this month. It's 'double your fun' month so I am back with a project inspired by another photo (see below). It's perfect for those of us (me included) who just don't want to let go of the summer.


I drew my inspiration from the ride itself, the colors, the sparkle of the lights and the straight lines. I created the right hand page of a 2-page layout featuring me, my darling children and my nephew riding the ferris wheel. I love the mix of vibrant and muted colors in the DCWV - My Sunshine Stack. I was able to make my own embellishments from the 2 pages of cut outs in the stack. The tag, the word "curious" and the phrase "I love this" for example.

I set the layers apart by inking the edges with Tim Holtz Distress Ink - antique linen - with a brustix. That allowed me to get into small areas because I did all the inking after the entire layout was completed.  Jolees makes the best titles! I've been waiting to use this one for quite some time. So worth the wait!!! The sequins from Lawn Fawn Peace Love Joy give this page a little extra sparkle. My favorite pen for journaling is Copic Multiliner (0.3 size). Today I used brown to allow the pictures to shine the most rather than the words.

Thanks for stopping by! I hope you check out the challenges over at Scrapstuffz "Inspired By" Challenge blog. If you'd like to see the right hand page and the complete layout together pop back here tomorrow. It's been a pleasure to guest design this month!

La-Vie

Challenges

Sunday, June 29, 2014

Lawn Fawn Kiwi Lane Christmas '05 Layout


My 9-year old daughter and I got some uninterrupted quality time together to craft this week. I've been planning this project in my mind for years and finally bit the bullet. We are making an album of our Christmases with family over the past 9 years and will add to it each year. My side of the family lives about 6 hours away driving and we only see them a few times a year. Those times are special and we wanted to give this album to them for one of their Christmas gifts.

In the first layout, Zora is just a couple weeks away from turning one year old at her first Christmas. She chose pictures of just her and me and my husband for this one and a second layout to come will feature auntie and grandma sharing in her special moment.


I'm teaching Zora how to design scrapbook pages with designer collections like Lawn Fawn's Peace Joy Love templates by Kiwi Lane. In the process she schooled me on a few techniques! Go figure. Children are so creative. It doesn't matter how many classes I take and certifications I get, she's amazing and keeping me on my toes. I guess you're wondering what she taught me....


I allowed Zora to choose any embellishments she wanted from my Christmas section in my ScrapRack. She chose pine cones and candy canes along with a Jolee's Christmas tree. The pine cones are singular but she said I'm going to make a wreath. I was thinking...what? but look how nicely it came out and accents the page?! I was like go Zora, go Zora, get busy!! (dating myself for real!) But really, it's nice that someone enjoys what I enjoy and that I can share it. Sigh.....

The red cardstock is by Bazzill and the patterned ones are by Lawn Fawn. Kiwi Lane templates Happy Trails and Spook Alley were used. She traced the designed on the back side of the cardstock with a signo white uniball pen and cut it out with Elizabeth craft fussy cut scissors.


The photo mats were cut with the Cricut Expression 2 from the wintertime layout on the Artbooking cart by CTMH. The vellum sticker is by Anna Griffin Yuletide Greetings. The title is made out of K&Company's Christmas themed Chip Box. They are not self-adhesive so she used Zots glue dots and Scotch ATG to adhere them.

The "1st" portion of the title is customizable Thickers by American Crafts. The font is called rainboots. They come in white and the top (and bottom) is a sticker. You can add anything to the top to make it match your project. We decided to go with ultra fine transparent crystal glitter. I cannot remember where the pine cones and candy canes are from. They are with recollections or Jolee's. Another adhesive she used was Xyron 2.5" sticker maker.

I hope you enjoyed this Christmas in June presentation. I'll be sure to share more of the layouts my dear daughter creates as we create "the gift of a lifetime..." (wish I had one of those echo mikes for that phrase - smile!)

La-Vie and Zora

Challenges


Tuesday, June 10, 2014

Tim Holtz Distress Glitter Birth Announcement Frame


I got crafty this past weekend! I made a birth announcement frame for my son's daycare teacher. I was inspired by the song "Isn't she lovely" - Stevie Wonder.  I also was dying to use this Heidi Swapp frame and the new Tim Holtz Distress glitter. This was a labor of love and a craft of truly epic proportions. The nursery colors are pink and brown. Pink is my favorite color so I was tickled to work on this project. The walls are pink so I though focusing on brown would allow the birth announcement to pop on the wall.


Supplies
  • Heidi Swapp decorative wooden shadow box frame 13.5" x 11"
  • Recollections - felt bow, bling, sequin bear
  • American crafts - Thickers
  • Adhesives: 3D Galazy Gloss, Hot glue, Glossy Accents, sticky dots by The Paper Studio
  • Ribbon - stash (perhaps from Micheal's)
  • My Mind's Eye - lost and found two polka dot cardstock
  • Basic Grey - "happy day" flair from the Hey Girl collection
  • Tim Holtz - blending tool, Vintage Photo distress ink and distress glitter
  • Buckle Boutique - Dazzling Diamonds (mounted to mat board and cut with Sizzix die)
  • Flowers - pebbles, paper studio - spare parts, prima, jolee's, recollections
  • Copic markers - E37, E18 hand colored pearls in the bottom right corner


I printed the picture at 25% and edited it in PicMonkey to add the birth info and a simple frame. The picture is mounted on two layers of the leftover part from pop dots. I use it all! 


Although it's not my usual style, I took a risk and created a collage with flowers and accents. Some I built by laying with foam tape. The flower in the lower corner was made by my friend Lyne and I added my new fav craft item - dazzling diamonds by Buckle Boutique. My friend and CTMH rep Cardmonkey Jarvis gave me some to play with at Eileen Hull's Paper Trail. Eileen brought mat board and sizzix dies to get our crafty juices going. Thanks ladies!!


Tim Holtz distress glitter is like glass glitter but without the glass (YAY!). It goes on best with a wet glue that dries clear. I tinted the decorative part of the wood with Vintage Photo distress ink first just in case I missed any spots with the glitter. The result is a vintage look with a brilliant shine. Love it!! I also love the depth of the frame. It's perfect for really tall embellishments and for layering to build the perfect scene.


I attached the ribbon to the back with hot glue using plaid hot glue helpers. The best thing that ever happened to me!! I was able to spread the hot glue and press it with the tools and not get burned or make a mess! Woo hoo! I will use hot glue much more often now-a-days!

Well, I hope you enjoyed this post and will let me know what you think!

La-Vie

Challenges


Tuesday, March 4, 2014

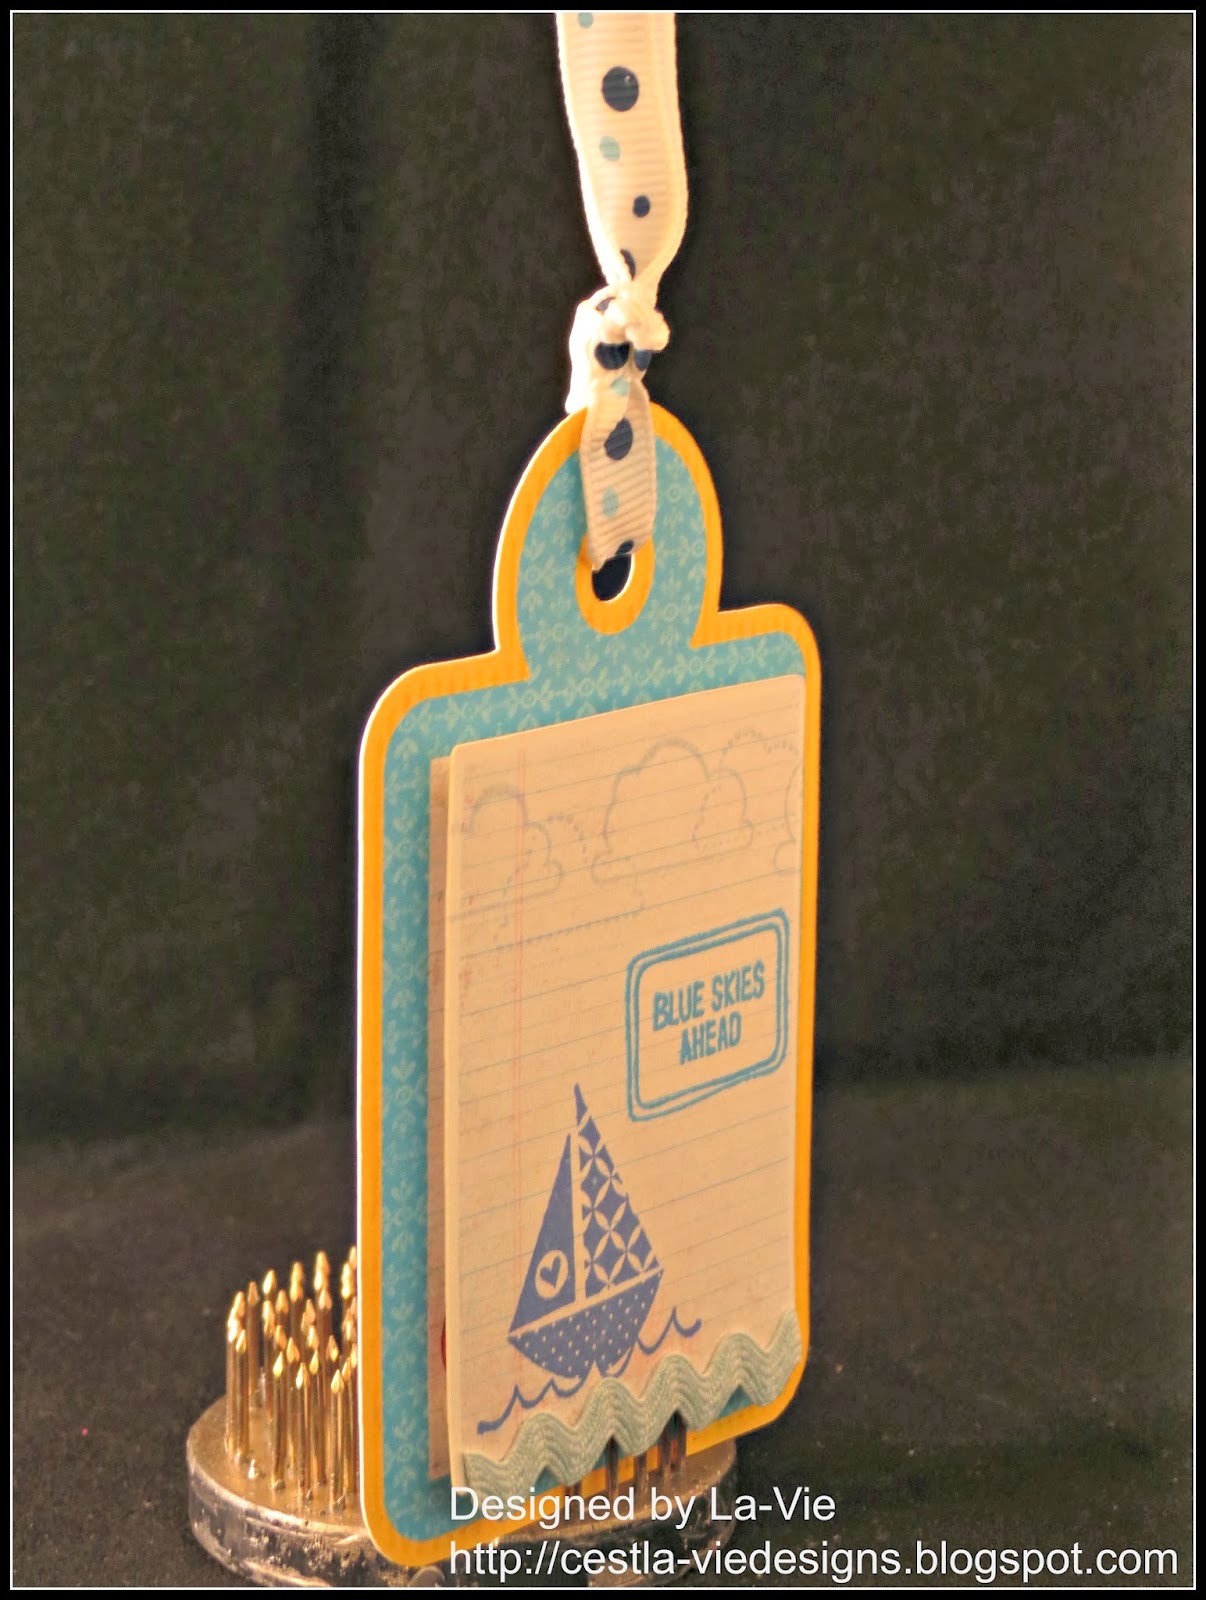
Blue Skies Ahead!


I had another swap-ortunity lately! Wink...wink! This time it was a boy-related tag swap. I decided to make a 3D rage cuz I'm really starting to get into the boy theme. I'm gearing up to continue scrapbooking the precious moments of my 5 year old son's life. 


This tag was printed and cut on the Cricut Imagine machine. I didn't think the image on the tag was manly enough so I decided to layer the top and create my own stamped scene. I'm very happy with the results.


Supplies:
  • Tag print and cut from Cricut Imagine - Imagine More cart at 4"
  • Notebook paper layer print and cut at 4"
  • Bazzill basic white cardstock
  • Boat stamp - Recollections - Memento Ink: Danube Blue
  • Blue Skies stamp - Inkadinkado: Road Trip - Memento Ink: Bahama Blue
  • Clouds border stamp - Recollections: Fun Borders - Memento Ink: Summer Sky
  • Recollections Foam tape
  • Jolee's Boutique red, white and blue ribbon
  • Queen and Co. blue and white ribbon
  • Martha Stewart ric rac ribbon
  • Xyron

Thanks for stopping by! Tell me, do you find it easy to make multiples of the same design?

La-Vie

Challenges:


Saturday, January 18, 2014

Get Inky! Farewell and Welcome Blog Hop

Welcome to the Get Inky! "Farewell and Welcome" Blog Hop!


You're in for a treat! We're hopping to usher out the 2013 design team while welcoming in the 2014 design team, some of whom are new to Get Inky! Stamps. As you may know, I am saying farewell. I was a part of the 2013 DT. It was an amazing experience, which makes it a bittersweet moment as I move on to new adventures. 

Well, you should have come from Kathy's blog, but if you have come here first, be sure to start at the Get Inky! Challenge Blog for a chance to win a fun prize!

I created a fun Valentine's Day themed Inner Stair Step card using four different Get Inky! stamp sets available on Etsy. I've seen all kinds of stair step cards but this one was new to me and I love it!! I added a stamped and layered piece to the highest step to create the look you see. 


My focal point is the lovable monster from Get Inky's 2013 Halloween Spooktacular set. She was so fun to color! To make her a girl, I drew on eye lashes and used a flower stem stamp (from the Love Bugs set) to create a bow for her 2 strands of hair.  I love using unusual stamps to create a desired effect. I also created my own embellishment by layering a dimensional sticker on top of a felt heart on the second step. SO much fun!! I encourage you to make your own Valentine's using Get Inky! Stamps. There a lot to work with combining all the sets. Gets your creative juices flowing!


Supplies:
  • Get Inky! Stamps - 2013 Halloween Spooktacular, Love Bugs, Geeky Fun, Whimsical Moon and Stars
  • The Paper Cut - Inner Stair Step Card (festive variety pack)
  • Copics  - R81, R83, R35, Brown and black multiliner pens
  • DCWV patterned cardstock and Sweetheart paper
  • Copic Xpress It blending card
  • Memento Ink - Tuxedo black, Rhubarb stalk, Ladybug
  • Recollections foam tape 
  • Jolee's - heart, xoxo embellishment
  • Stash - red felt heart
Now for the fun part! Leave a comment on each blog (by Wednesday) along the way and you'll be entered to win:
 
* one of three one-year Inky Moonbeam memberships - 
To see what the club is all about, visitwww.bluemooncreation.net
* one Crafty Card Gallery app donated from Jennifer Restivo

I'm so glad you hopped by! Your next stop is Lyne's inspiring blog. Until we meet again... Get Inky!!


Oh wait!! I have a great giveaway going on for my followers. So follow me on google and/or bloglovin' and click here to share your crafty resolutions for a chance to WIN!!


La-Vie

Here's the whole hop lineup (just in case you get lost):

  1. Get Inky! Challenge Blog 
  2. Ann
  3. Beth
  4. Crystal
  5. Jamie
  6. Jessica
  7. Judy
  8. Julie
  9. Kathy
  10. La-Vie
  11. Lyne
  12. Susan B. 
  13. Susan R 
  14. Tonya
  15. Thia 

Monday, December 30, 2013

Altered Art - The Letter "B"


This Fall I participated in an altered letter swap with Kraftie Kre8ations. My swap partner's name starts with the letter "B" so that's what I created. It was quite a fun little exercise!


I started out by purchasing a flat wooden letter (14" I think) from Hobby Lobby and painted it with Gesso. Once it dried I painted it again with several coats of Martha Stewart glitter paint in purple, my swap partner's favorite color.


Once it dried, I added the embellishments - clear bling, heart-shaped purple bling, dimensional flowers, ribbon, flower trim and a butterfly. I believe less is more!

I hope you enjoyed this project as much as my swap partner did!


La-Vie

Sunday, November 17, 2013

Black Diamond Deals - All That Stickles Nov Blog Hop


Welcome to the Black Diamond Deals Blog Hop brought to you by the All that Stickles design team!

The biggest shopping day of the year is just around the corner, and the ATS design team has put together some fun, sparkly shopping projects to help inspire those shopping lists! (And maybe the shine from all the glitter will help wake you up in the middle of the night to hit the stores!)

If you've come from the fabulous blog of Karen S., you're in the right place! However, if you've just come across the hop, please visit All that Stickles for the full lineup.


Stickles fans, I have an up-cycled project for your viewing pleasure today! I am a stay-at-home mom and I go through Tide pods like no tomorrow. Every time I toss one of these in the recycle bin I think to myself, I can DO something with that container!! It's got a great lid, I can reach my hand in... hmmm. Not until now, have I figured out a way to reuse this container!! With Black Friday coming up, I am making my shopping list and saving my pennies! LIGHTBULB MOMENT!! I created a bank! 

I love the Car Decals Cricut cart and decided to represent our Black Diamond Deals theme using Black Diamond Stickles on this super cute shopping mom. I imagine she is at Black Friday raking in the deals!! 


Here's a closeup of her! She is mounted on the back of the Tide container. I did not remove the original label, rather I covered it with Washi tape and coordinating cardstock. Black Diamond Stickles has many other colors (blue, green, gold) sprinkled in there for an amazing sparkle and shine. Paprika Stickles as an accent just makes it pop!


On the back, my true intention is revealed!! YES!! I'd rather be shopping! The phrase also is from the Cricut cart Car Decals but the shoes are from Forever young. The Black Diamond and Paprika Stickles were applied here as well. And on top, a beautiful bloom from Jolee's Boutique.

QUICK TIP - running the die cuts through the Xyron and adding Stickles while it's still on the backing allows for more precise placement. When it's dry you can easily peel up the sticker and chip off or bend back any overhang of the Stickles.


Here's a closeup but it still doesn't do justice to the sparkle and shine! But I have a real cute up-cycled bank for my Black Friday foray!! 

Supplies:
  • Stickles - Black Diamond, Paprika and Burgundy
  • Recollections - whitewashed, orange, black cardstock, Washi tape
  • Jolee's Boutique - fabric flower
  • Cricut carts - Car Decals p.37 cut at 5", phrase p. 70 cut at 2", and Forever Young shadow on p. 54 cut at real dial size 2.5"
Blog Candy Alert!!!

We have blog candy for those who are a follower of All that Stickles and leave a comment on every stop of the hop! Winners will be announced Wednesday November 20th at All that Stickles.

$15 Gift Certificate
7 Digital Stamps of Winner's Choice

3 Digital Stamps of Winner's Choice
(If you email TSC letting them know you're hopping with us, you'll receive a free image!)

2 Digital Stamps of Winner's Choice


GUESS WHAT??? I've got even more blog candy for ya!!  
One lucky follower (anywhere in the world) who comments on this post AND follows me via social media (see below) will win a mystery crafty prize pack!

Please leave one comment total telling me you followed me on:
  • this blog with bloglovin AND in blogger (see buttons on the sidebar of this blog) 
  • Pinterest
  • Twitter 
  • my Facebook fan page
  • Instagram - user name laviebordeperry
  • YouTube
  • Share this post with friends. Let them know to leave a message telling me who sent them.
  • In your one (and only) comment, please let me know where you followed me and the user name you used at each one (so I can verify all your entries)
Here's the complete blog hop lineup:
Thanks for hopping! :) Remember, follow me to win! And, don't forget to check out our Let's Talk Turkey Linky Party!


La-Vie