Showing posts with label our daily bread designs. Show all posts

Saturday, March 28, 2015

Create a Card Blog Hop!!!!!!


Welcome to the Create A Card Blog Hop! We are so happy you could join us today.  This is a one day blog hop, but don’t worry you have until Monday to stop by all the blogs and leave a comment to be entered into the drawing for the wonderful prize we have for you.


If you started at the beginning of the hop at Scraps by Gracie, 
you should have arrived here from Pamela's blog.

Catherine Pooler, founder of Stamp Nation and CreativityGrows Here has generously donated a trial membership to Stamp Nation for us to give away to those who hop along with us!!!!


To be entered into the drawing, just comment and follow each of the blogs on the hop today. That's it! It's just that easy! Prizes will be drawn and announced on Theresa's blog Scraps by Gracie on Wed. April 1st - and that's no joke!

But WAIT!!! To sweeten the pot, I also have blog candy of my own. Please comment here, follow my blog with bloglovin or GFC and follow all my social media links found at the bottom of this post to be entered for to win some crafty goodness.

Please leave me your email address in your comment. It will be the only way I can contact you.


*****************************Now on to the project!**********************************

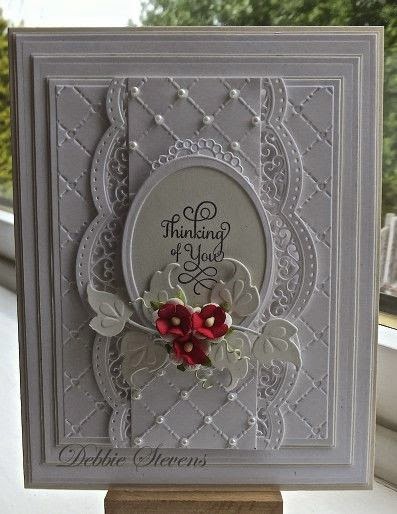
I decided to CASE (copy and share everything) a card from Pinterest. At the end of the post I shared the inspiration and the designer's blog. 


I created two almost identical cards based on the original. I have always been curious about the white on white on WHITE cards. It makes me think... what's up with all the white? But I must say I GET IT now. It's gorgeous...refined... classy...especially for wedding cards.


All the patterned cardstock came from a single SEI stack called white elegance. The cardstock is white with an embossed white pattern. I chose patterns that would blend in and complement each other.


One of the layers is punched with a Martha Stewart punch, the top note is made using Stampin' Up! nesting dies and accented with a punched element on top. A Prima flower and diamond shaped Recollections bling accent the card front.


Just look at all that dimension! But guess what? It can still fit in a normal envelope!!


Our Daily Bread Designs had the most wonderful wedding sentiment - recipe for a happy marriage - and the cake stamp is from Recollections. I used Versafine for the sentiment and Encore metallic ink for the cake. Oh and both of the external sentiments are from Recollections stamped in the same inks.


I bet you didn't notice....for extra flair, the card base and a couple of the layers are made with heavy weight cream shimmer cardstock from my stash. I am very happy with how it came out. Surprisingly, CASEing a card takes much longer than creating one from scratch.

Here's my inspiration by Debbie Stevens of PaperPastimes. I fell in love with the layers and the richness of her creation. 


Please be sure to hop over to all the other wonderful blogs. Here is the entire line-up:


Thanks for hopping by!!!


La-Vie

Challenges:


To be entered for the prize, please follow me on social media and help spread the word about me.

Pinterest


Monday, November 3, 2014

Wedding Card Collabo Featuring Our Daily Bread Designs, Gelatos and Color Me


Hello everyone! Prep for my post today started a couple of months ago when I was teaching my 9-year-old daughter craft techniques using Gelatos on Color Me card toppers by Hot off the Press. She loves art and painting so I figured Gelatos would be a great tool for her. I gave her the guidelines, a card topper, the gelatos and a baby wipe and off she went coloring and blending. What she came back with was stunning. So I promised that one day I would make a card with her creation.

Fast forward to the present. I came across the card topper my daughter colored this past weekend at the precise moment I was scrambling to find a starting point for a unique card for a young couple who's wedding I was about to attend. So I remembered my promise and got to work. Here's what I cam up with.

The card topper was rectangular in the beginning but I asked my daughter to cut out the bottom edge along the design to bring more drama to the card front. The topper almost fit the 5x7 card but I needed to trim a bit off the right edge.

Now what I thought? Some questions arose... could I heat emboss over the Gelatos? I knew I wanted to use this darling stamp from Our Daily Bread Designs and one from Recollections.  With not a second to spare I swiped the topper with my embossing buddy, stamped with Versamark and embossed the happily ever after sentiment in detailed embossing powder by Ranger. Using the 9" Xyron I attached the topper to the card base and moved to the inside of the card.


Next I embossed the Marriage Recipe on the inside of the card and voila! the card was complete. I will definitely do another collaboration with my daughter soon. It definitely helps when they want to help in the craft room (but in certain cases that's not possible or practical).

Supplies:

  • American Crafts - green 5x7 card base and envelope
  • Hot off the Press - Ebony Color Me Floral Card Toppers
  • Recollections - Just married stamp set - Happily Ever After sentiment
  • Our Daily Bread Designs - Happy Marriage Recipe
  • Ranger Super Fine Detail embossing powder - black
  • Tsukineko - Versamark
  • Impression Obsession - Mini Mount
  • Tim Holtz - Grid Blox
  • Xyron - 9" Creative Station 
  • Stampin' Up! - Embossing buddy

Thanks for stopping by! If you have tales of you and your kids crafting, please share your story and links in the comments below and I'll check it out!

La-Vie

Sunday, May 5, 2013

Our Daily Bread Designs Make 'n Takes


In April I attended the Heirloom Rubber Stamp and Paper Festival in Allentown, PA. It was fun to shop and do make 'n takes like these ones from Our Daily Bread Designs. This super cute apron card was created by stamping, punching, layering, tucking and making knots. Simple right?!

Our Daily Bread Designs offers coordinating stamp and die sets. The apron card and the spoon, spatula, and rolling pin were cut using the Apron and Tools dies set. The stamped bread, wheat and muffin is from a set called Recipe Card Icons. Although it is not shown, the sentiment inside the card "Baked with Love" came from the Baking Tag Sentiments set.

I love the look of the punched edges that gives the card that extra zing! The picnic table-ish background was created with a product I am obsessed with - the cover-a-card stamps from Impression Obsession. We knotted our ribbon before adding it to the card front with glue dots and presto! a great look!


Flower Soft is one of the products I like to collect but have been shy to use. I was glad to get some practice creating this lovely friendship card.

Our Daily Bread Designs carries Flower Soft card topper collections that serve as the focal point of the card. Cut out and popped up with foam tape is the best way to showcase its beauty. Add a stamped sentiment from ODBD and a bit of flower soft (added on top of white glue) here and there along the garland and in the teacup it's an instant hit!

I hope you enjoyed this quick post. Check back for more make 'n takes from the Heirloom show....

La-Vie