Friday, May 31, 2013

Lady Luck Card


Here's a quick post! I'm up against a tight deadline. I love the adrenaline rush of getting a project done in 30 mins.! I envisioned this project by picking the stamps last night but finished it up on the spot.

At the Crafting Cafe we were asked to interpret "Lady Luck" for this week's challenge. Here's my interpretation. I hope you like it! I identified with the "lady," a stamp from Stamp LaJolla, the frog from The Stamps of Life and the cute quote from Repeat Impressions. The bib card is from The Paper Cut but I hand cut my own bib in the color I needed. That reminds me! I am entering a second challenge at The Paper Girls. It calls for the colors navy, cream, coral and touches of yellow, pink and green based paper from Dear Lizzy Lucky Charm. I also entered 3 Girl Jam anything goes with ribbon.

Additional Supplies:

  • Copics RV34, Y15, G07
  • EK Success scallop punch
  • Stampin' Up! Coral ribbon
  • Marvy 1.5" circle punch
  • Bazzill cream cardstock
  • Jet Black Archival Ink by Ranger
  • Ad tech Dot glue runner


See you in the morning for the Get Inky! Stamps blog hop!!  It's going to be EPIC!

La-Vie


Sneak Peek!!! Get Inky! Stamps Blog Hop


I'm so excited about tomorrow's Get Inky! Stamps blog hop. It's their first AND my first. My invites are out, my blog post is prepped and scheduled. I'm bursting with excitement so I thought I'd share a sneak peek of my project. Can you guess what it is????? Well, you won't have to wait much longer. Come back tomorrow and share the hop post with your friends... you'll have all weekend to leave your comments to win lots of blog candy!!


La-Vie

Thursday, May 30, 2013

Red, White and Blue Challenge


Today I made a small card (thank you card size) for the challenges at CAS-ual Fridays and The Alley Way Stamps which both call for Red, White and Blue creations. It took me 20 mins to make it, upload the picture, edit, post to the blog and enter with only 3 mins to spare on the CAS-ual Fridays blog!! Whew!! What a rush????!!!

I needed to use TAWS digis to qualify so I printed a free matching image and sentiment from their website. I placed the images in MS Word and printed on Neenah cardstock (one of the best for coloring). Recollections makes a stamp set of all splatters that seemed the best to use with the TAWS digis. Using TPC Studio Clearly Better ink in Navy and Scarlet I completed the look. The TAWS inspiration photo called for a little brown so I colored the paintbrush with my Copic marker Y26. This little painter didn't wash off her brush so she has both red and blue paint on the bristles. I achieved that look by picking up ink from the ink pads and using a blender pen from Marvy (Le Plume II) to add the color. There's a broad tip and a fine tip.

This card is whimsical, clean and simple. I hope you like it!

Challenges:
Cas-ual Fridays CFC102: Red White and Blue
TAWS Be Inspired #29

La-Vie

Wednesday, May 29, 2013

Washi Tape Sunburst LO


Here's my version of a washi tape sunburst. My idea was to cut a whole in the cardstock in order to place a second piece of cardstock behind with the washi tape stuck down in a sunburst pattern. The tape was very forgiving no matter how many times I took it off to rearrange it.

Do you use washi tape? I'd love to hear how. Fill me in??!!

Supplies:

  • DCWV The Spring Fling Stack
  • Washi tape
  • Creative Memories Cutting System large wavy circle (cut with blue blade)
  • Pressed Petals Scrap metal adhesive letters
  • Jolee's Boutique Dimensional stickers (flowers), title and pearl and bling embellishments
  • Spectrum Noir alcohol marker - BP4
  • Recollections 8 1/2 x 11" white cardstock


Challenges:
All About A Girl - May 15 Bursting at the Seams


La-Vie

The Best Dad in The World


Ooooooooh wee! I feel free. I always have a tough time creating male-oriented crafts. But today I made this card super fast using a DCWV stack and a sketch. I was able to cut out elements of the cardstock using my new fussy cut scissors. So easy on the hands (I have chronic tendinitis).

It was amazing how quickly and easily this came together. My hubby is going to love it! You've got to try this type of crafting. It takes a lot of the decision making out because all the patterns work together. Wish me luck in the two challenges I am entering. Join me if you can.

Supplies:

  • DCWV Guy Stack
  • Martha Stewart  Punch Around the Page - Cathedral Lace
  • TPC Studio Clearly Better Navy Ink Pad
  • Elizabeth Crafts Spring Action "Fussy Cutting" Scissors


Challenges:
DCWV May Stack-a-holic Template Challenge
HIMCR #99 Father's Day
Clearly iStamp Father's Day Challenge


La-Vie

Dancing Queen


This is my daughter Zora from her last dance recital in 2010. She no longer dances (unless it's Zumba). I'm making my challenge debut on the All About A Girl challenge blog and DCWV Stack-a-holic (describes me to a T).

Let me tell you what!! This layout came together soooo quickly!! I always wanted to scrap like this but never got the courage to do it. I created this page with only the supplies in the DCWV Garden Party Stack. The only things added were the Thickers to spell my daughter's name and the twine in the tag and the banner. AMAZING!! I hope you like my challenge entry and will give it a try yourself. DCWV provided a sketch. Check out the link below to see it.

Supplies:

  • DCWV Garden Party Stack
  • Cricut Cartridge Shall We Dance - Dancing Queen and shadow cut at 2"
  • Thickers (American Crafts) - Rainboots glitter foam stickers
  • American Crafts - blue twine


Challenges:
DCWV May Stack-a-holic Template Challenge
All About A Girl May 1st Challenge


La-Vie


The Great Toilet Paper Caper


Here's my son Aidan being a boy.... I have been dreaming about this layout for years. I'm glad to have finally gotten it done. I struggle with boy pages because I had my daughter first and am used to all things frilly. I'm looking forward to increasing my boy scrapbook skills. Share your tips?!

Supplies:
  • Ana Griffin Cuttlebug and Swiss dots folder
  • Cricut Cartridge - Create a Critter 2 list cut at 8" and Fontopia font 1.5" (shadow and font)
  • TPC Studios Clearly Better - Navy
  • Memories Direct long reach stapler, blue staples
  • Stampin' Up! patterned paper
  • American Crafts ribbon
  • Creative Memories corner rounder
  • Bazzill white cardstock
  • Leaps and Bounds Snips and Snails Vellum Phrases
  • DCWV Boy Colored Transparency Quote Stack
  • Recollections floral embellishment
  • Blue Copic Multiliner
  • Pressed Petals Scrap Metal
  • Blue corner embellishments - stash
  • Adhesives: Scotch ATG, Zots, Tombow stamp runner and Vellum adhesive


My own quilted toilet paper!


Challenges
About A Boy Scrapbooking Challenge Blog - Boys will be Boys
About A Boy Scrapbooking Challenge Blog - White plus one
3 Girl Jam Anything Goes with Ribbon


La-Vie

Tuesday, May 28, 2013

Have a Crab-u-lous Day!


I'm back into entering challenges! Have you missed these posts? I sure have! I'm hoping you can join me in some of these challenges. If you do, please share your projects with me!

Supplies:

  • Card base American Crafts 5x7 green
  • Navy Patterned paper - Stampin' Up!
  • Yellow layer - Bazzill cardstock
  • White circle - Recollections card stock
  • Ink: TPC Studios Clearly Better (Navy and Green)
  • Stamps: Inkadinkado Fish and Friends, Sentiment: My Pink Stamper Biggie Punnies
  • Ribbon: American Crafts
  • Punch: Marvy 2" circle punch
  • Action Wobble


Challenges:

Action Wobbles #55 from the ocean
Repeat Impressions Sketch Challenge M1513
Tsunami Rose Challenge #21 Cards 
Repeat Impressions DCC522 Fur, Fins or Feathers
3 Girl Jam Anything Goes with Ribbon
The Playdate Cafe Challenge #183


La-Vie

Monday, May 27, 2013

Good Golly Glitter Challenge - Get Inky! Stamps


It's the dawn of a new crafty challenge over at the


This time we're looking for those glittery creations. To inspire you, I created a clear card using stamps from Sew Sweet Cupcake


I was really interested in trying out the whole clear card thing... I wanted to stamp, color with glitter and create a fabulous card. In the end, I did just that, but it took many tries to get it all pulled together. I almost pulled my hair out y'all!! But my frustration will help you avoid the pitfalls and reap all the benefits.

I started out with a clear card from Close to My Heart. It has a plastic coating that must be peeled off on the outside and the inside of the card. I attempted many times to stamp directly on the card front but it did not work. I think I need some re-inkers for my Stazon ink pads.

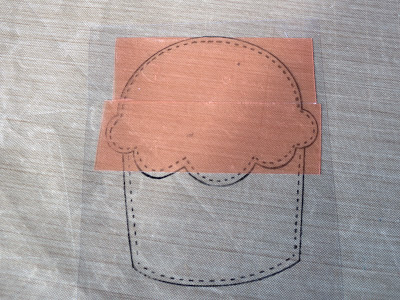
Determined to complete the project, I pulled out my 8 1/2 x 11" clear vinyl sheets from Stamp La Jolla (used for windows or shaker cards). It's 5 mil so it's thin and flexible. I stamped the cupcake on it and cut out a square around the cupcake to give myself some wiggle room.

Let the magic begin!! I covered the BACK of the cupcake top with Terrifically Tacky tape, then I fussy cut the vinyl with the tape attached for a clean  look. I am in love with my new fussy cut scissors by Elizabeth Crafts. I was able to get into all the tiny spots and to get under the tape in the areas at the lower end of the cupcake top. That was very important for making the two sections the right colors without overlapping.


I peeled off the red layer from the tape and applied Doodlebug Design Sugar Coating cupcake glitter (how fitting?!) in pink. I pressed my fingers into the glitter and rubbed pretty hard to burnish the glitter to the tape. Once it was set, I taped the bottom of the cupcake and glittered it in American Crafts Wow! Cricket (green). Using the Xyron I adhered the cupcake to the card front.

Both glitters are translucent. Perfect for highlighting the cardstock I chose from DCWV Nana's Kids stack. The cardstock is glittered and shiny as well. I cut two identical pieces and using Tombow Vellum mono adhesive I adhered them inside the front and back panels of the clear card with the design facing outwards.
rear view of the card
The finishing touches were added with a Get Inky! Stamps sentiment inside the card and a sheer bow made with ribbon from my stash (hand tied by moi!).


Good Golly Glitter!!! I hope you try this technique. Until next time... looking forward to seeing your creations in this challenge.

Challenges:
3 Girl Jam - #19 Anything Goes with Ribbon
Tsunami Rose Designs: Wednesday Challenge #21 - Cards

La-Vie

Sunday, May 26, 2013

Personalized Water Bottles for Lacrosse


My daughter just finished her first season of Lacrosse. I chose the sport for her and neither of us knew anything about it when she began. She has developed a love for the sport and pick up the skills required rather quickly. The team gelled and finished the season undefeated.

To congratulate all the teammates my company is donating personalized aluminum water bottles for each girl (two teams = 33 girls)! Each bottle features a lacrosse player with the girl's name and jersey number. Here's the first one I completed for my daughter Zora who was #57. I tied bows on the cover and attached a tag with my company info with twine to complete the look.

Supplies:

  • Aluminum water bottles - Dollar Tree
  • Gold adhesive Vinyl 12" x 24" - Oh My Crafts!
  • Cricut Transfer Tape
  • Cricut E2 - Cricut Decals (lacrosse player 3.5") and Hannah Montana (font 1" and numbers .25")
  • Ribbon, Twine - American Crafts
  • Tags - Hero Arts
Check back tomorrow for the latest Get Inky! Stamps challenge and my inspirational post. I hope you'll join in on the fun!!!
La-Vie

Saturday, May 25, 2013

Get Inky! Stamps Repeat {Repeat} Blog Hop


As a part of the Get Inky! Stamps design team I am participating in my first blog hop next weekend in celebration of Repeat Day. The blog hop will start at the Blue Moon Creation. Learn more about this holiday here.

Help me spread the word... tweet it, blog it, share it, shout it from the crafty rooftops!! I'm so excited! Thanks so much crafty friends! See you at the hop!


La-Vie

Friday, May 24, 2013

Partial list of Cricut carts with fonts AND samples

I was searching for a particular font for a big project I am working on and came across this!!! It's amazing. If you ever wanted to know what the fonts look like on most of the Cricut carts here's a downloadable list. It hasn't been updated since 2011 but there's still a great deal of info here. Thought I'd share....

The Cricut Lovers Guide to Design Studio: Full list of Cricut carts with fonts... AND sample...


La-Vie

Wednesday, May 22, 2013

About A Boy Scrapbook Challenge Blog: Design Team Call


Here's a great blog for monthly scrapbook challenges! If you're interested in joining a fun design team, they are looking for several crafters to join their design team. Click on the link above for more details. Don't delay! Enter today!


La-Vie

HELLO KITTY die cuts - Graduation


More Hello Kitty!! Yesterday I posted all of the specs for this die cut. Click here for the info. Today I wanted to share more tips and tricks. I made 2 die cuts the other day with a black and gold color scheme. As you know, Hello Kitty must be black and white so it was a challenge to differentiate between the black cap and gown versus the black shadow required for a proper Hello Kitty image.

Never fear!! Glittered cardstock to the rescue!! I used it for all 3 colors you see. It was the perfect was to differentiate.


Gold foil cardstock was used behind the pleats, in the hat and for the tassel. It was the first time I even considered bringing in that pop of color. I love the result!! One die cut was added to a keepsake box so I made the black layer out of chipboard and cut the same image (flipped) out of wonder tape (double-sided sheets of the red tape we all know and love!) so that it would adhere well.


When I neglected to get it just right on the die cut I used my fav new fussy cut scissors to neaten things up. Worked like a charm... The red layer is still on and can be peeled when ready.


Here they are!! Aren't they just darling?? I love Hello Kitty!


La-Vie

Tuesday, May 21, 2013

Graduate Hello Kitty Card


I remade this card - one I made for my daughter years ago (click here for the original post) - for someone yesterday. I love it even more now that I corrected a multitude of sins from the original version. 

My fav tip from this project is... when you punch the card edge before embossing the front, the pressure will cause the punched area to emboss the cardstock on the inside of the card. I accentuated that embossing by inking the hearts with Tsukineko Brushstix and Hero Arts Pink Neon ink (applicator through the punched areas) and outlined with Zig Millennium pen in pink. 


I love the Quickie Glue pen's fine tip to help keep the tiny parts of her bow and her neck in place. Using 3 - 3D glue dots under the left side, I attached the Hello Kitty and her hat to the card front.
Supplies:
  • Cricut Cartridge Hello Kitty Greetings - pg 60 cut at 5"
  • Anna Griffin Cuttlebug, Embossing Folder - Heart Blocks
  • Cupcake ribbon from stash - bought at Michael's
  • Bazzill basics white and premium pink cardstock (card base cut at 12" x 5")
  • DCWV black, yellow glitter, red glitter cardstock
  • Martha Stewart Punch Around the Page - Heart Chain
  • Creative memories corner rounder
  • Zig Millennium Pen - pink (used to trace the embossed hearts inside the card)
  • Hero Arts Pink Neon ink
  • Stamp: Hampton Art Signature Collection (graduation set)
  • Tsukineko Brushstix
  • Adhesives: Xyron, Scotch ATG, Zots 3D glue dots, Quickie glue pen (pinpoint roller)


When the stamped image didn't come out as solid as I like, I used the Brushstix to fill in with Hero Arts Pink Neon ink.

I hope you liked this quick trip down memory lane and the new enhancements.


La-Vie

Thursday, May 16, 2013

Thank You Gift Bag with Get Inky! Stamps


I looked and looked for the perfect packaging for my 25 thank you cards. There was none to be had! So I decided to decorate a gift bag myself to match the cards. It has the same die cut flower on the front (raised a bit on Zots 3D glue dots) and the same ribbon and colors of cardstock. On back I hand wrote a heartfelt note to Mrs. Souders.

I found a bling Breast Cancer key chain at Dick's Sporting Goods. I decided to tie the bag handles closed with a bit of ribbon and the key chain attached so it wouldn't get lost. I finally delivered the cards yesterday and they were well received and cherished! Mission accomplished!!


Supplies:
  • Get Inky! Stamps - Sew Sweet Cupcakes
  • Cricut Cartridge Florals Embellished -  cut at 6" 
  • Ink - Hero Arts Neon Dye Ink: neon pink
  • American Crafts ribbon
  • Adhesives - Scotch ATG, Zots 3D glue dots, scotch magic tape
  • Cardstock - Bazzill, DCWV Adhesive, SEI, Recollections
  • white K and Company gift bag 5.25" x 8.375" from target
I love the fancy font of the Get Inky! Stamps Sew Sweet Cupcakes stamp set. I used the Thank You stamp. Click the link above to check it out! I thought it was perfect for this project.

Hope you enjoyed this quick post! Maybe you'll be inspired to decorate a gift bag for the next special gift you give to a loved one.


La-Vie

Tuesday, May 14, 2013

My 1st Liebster Award!


Thanks a million Papercrafting Princess of Papercrafting Paradise for selecting me to receive the LIEBSTER award.  I was thrilled and honored to be considered.  For those that do not know, let me tell you about it...
This Award was designed to be a blog award in the "Pay it Forward" fashion. Once you have been nominated you award it to five blogs that you like that have fewer than 200 followers to encourage visitors to their blog.

Rules for Acceptance:
Thank the person who gave you the award and link back to their blog. Post the award onto your blog. Give the award to five bloggers that have fewer than 200 followers. Leave a comment on their blog letting them know that you have given them the Awesome Award. Pay it Forward.

So I went a blogging to search for five bloggers that I love, had less than 200 followers and have not received the award. Drum roll please..... and the winners are:
  1. Lyne
  2. Samantha E.
  3. Thomisia
  4. Thia
  5. ScrapbookChris 

Congrats ladies! Have fun paying it forward.


Here's the logo for your sidebar. If it's not your style, google Leibeser award and there are many images you can use.


La-Vie

Monday, May 13, 2013

Thank You Card using Get Inky! Stamps


A new challenge is posted to the Get Inky! Challenge blog! This time its a Die Cut challenge. To inspire you and encourage you to join this challenge, I created this thank you bib card. This card also was created for one more reason... but I'll share that later on in the post. Check back for more Design Team member inspiration for this challenge at the Get Inky! Stamps Blog.

Supplies:
  • Cricut Cartridge Florals Embellished -  cut at 2.75" 
  • Bib cards and overlays (variety pack) - The Paper Cut 
  • Martha Stewart scalloped circle layering punch
  • Ink - Hero Arts Neon Dye Ink: neon pink
  • EK success Powder Tool
  • American Crafts ribbon
  • Adhesives - Scotch ATG, Xyron 1" and 5", Zots glue dots, scotch magic tape
  • Tim Holtz tonic scissors
  • Cardstock - Bazzill, DCWV Adhesive, SEI, Recollections
I love the fancy font of the Get Inky! Stamps Sew Sweet Cupcakes stamp set. I used the Thank You stamp. Click the link above to check it out! I thought it was perfect for this project.

Using The Paper Cut bib card (4.25" x 5.5") and matching overlay (3.88" x 4.13") I created the card base. In order to get the scallop circle I used a little trick I learned along the way. I knew I was making a die cut for the card front, so I used a Martha Stewart layering punch where the die cut will sit. To make sure it would fit, I cut it out of paper first and put it against the base cut for the flower. Once the card is put together, no one will be the wiser!!! Maximize your resources folks!

I then placed the scalloped circle on scrap paper and stamped the Thank You stamp with Hero Arts neon pink ink.


When creating multi-layered die cuts, use DCWV adhesive cardstock whenever possible. This flower has 6 layers. It saves a step when the adhesive is already applied. Here's a picture of one of the layers I cut using the same settings used to cut adhesive vinyl. It's called a kiss cut - meaning the cardstock is cut but the liner paper below it is not. When you're ready to layer, peel the cut off of the liner just like a sticker.

When you're dealing with multi-layered die cuts, you may get glue boogers or extra glue overlapping. My sure fire fix for that is to use the EK Success powder tool. Applying powder to the sticky areas removes the stickiness so that the card won't stick to the envelope, etc.


I used the "cheater method" of adding my ribbon bow. Before placing the overlay on the card, I placed a length of American Crafts ribbon (4 3/4") across the card front and taped (with normal tape) the ends on the back of the overlay. I used a second length of ribbon (11") to tie the bow. It saves ribbon and frustration. Give it a try!

Note: because the ribbon is underneath the flower, I applied a glue dot behind each leaf to keep those adhered.

Guess what??? After making one card for the challenge, I decided to make 25 more for my daughter's 2nd grade teacher. She returned to school after an extended absence for breast cancer surgery. She is in remission and we all are so happy that God spared her life and brought her back to us. She is a wonderful teacher! I figured she might have quite a few folks to thank for their help, thoughts, prayers, meals, gifts, etc. and what better way to do so?!  


I made two of each card so I only showed you half of the cards. I changed the ink and ribbon to match. All the ribbon is spring related.


All the children wore team Souders t-shirts the day she returned. It was a love fest!


I hope you enjoyed today's post, will join the Get Inky! Challenge, use some of the techniques I shared and pay it forward with a random act of kindness.

I LOVE COMMENTS!!

La-Vie


Sunday, May 12, 2013

Blog Candy from my first Get Inky! Stamps Post


Happy Mother's Day!!

Thank you everyone for your support last week for my debut as a design team member for Get Inky! Stamps!! If you missed the posts click here for my blog and here for the Get Inky! Stamps blog. It was an exciting emotional wonderful experience. To show my appreciation, I promised a mystery prize for a follower who comments on both blogs. I'm giving away Stampin' Up! Whimsical Words and an ink spot. And the winner is....


To purchase Stampin' Up Products visit Samantha E's online store.


Angelica Chambers!!!!


Wow! Who would have guessed you used bow and cupcake stamps to make this flower?! Now I want to pull all my stamps out and see what new lines and pieces I can see in them! I am also a follower on your new Get Inky Stamps blog design team page! If I lived closer, I'd be the first to sign up for any workshops you hold... You should definitely hold some demonstrations/workshops. I love learning new techniques!

Congratulations! I loved what you posted this past week and look forward to seeing lots more exciting posts. Love love love your company name also! Fun fun!


Congrats Angelica! Your comments warmed my heart! Please inbox me your mailing address so that I may send you your blog candy!


La-Vie 

Saturday, May 11, 2013

Endless Creations Make n Take


At the Friday night make 'n takes party Endless Creations and Everyday Cards taught us how to make this amazingly cute gift card holder. Stamping, masking, punching and coloring were the order of the day!


We constructed the card from scratch and stamped the borders separate from the $ amounts. Guess what? It was very hard for me to line it all up. I had to have the teacher stamp it for me after several failed attempts. I'd use a ruler to do this type of stamping at home.


This is one of the cutest gift card presentations I've seen to date. I love that there's lots of room to write a message. Perfect for any event - especially with graduation season coming up!


La-Vie

Friday, May 10, 2013

Coloring with Pearl Pens and Glitter?? Denami Designs Make n Take


One of the coolest make 'n takes I had the pleasure of completing at the Heirloom show last month was lead by Denami Designs the stamp I used is called J146 Garden Bouquet.  It involved stamping and coloring with crystal lacquer pearl pens and glitter! The result? A 3D glitter glue look that doesn't flatten when it's dry. I love the look. Amazing....


Here's a side view to show the dimension. This is a technique I will definitely try. Denami sells it all... the stamps, ink, pearl pens, glitter and much more. After stamping the image, I used one color at a time to color in the parts of the stamp and sprinkle with matching colored glitter. I love the tiny precision tip on the crystal lacquer pearl pens. It really allows you to color with ease.

The representative mentioned that you could play with color by adding the pearl pen in one color and using another color of glitter to create a new color altogether. It's a must do! Note: it took a while to dry, similar to thickly applied glitter glue.


Have you ever tried this technique? Share your story...


La-Vie

Thursday, May 9, 2013

Sweet n Sassy Stamps Make n Take


This is the final post of make n takes from the Heirloom show.  It's a technique that I will employ again and again! I hope you will find inspiration from this clean, yet impactful card. 


Using post it notes to mask off the top and bottom of the card front Sweet n Sassy Stamps instructed me to layer on several Tim Holtz distress inks with sponges to create a sunset. Once the colors were blended perfectly, it was time to stamp the reeds (double offset stamping to create a shadow). Once the post it notes were removed, the sentiment was stamped on and the single bird die cut from the birds feather die set was added with pop dots.

La-Vie

Wednesday, May 8, 2013

Get Inky! Challenge 3: Fabulous Floral Fun


This is officially my first post as a design team member for Get Inky! Stamps by Blue Moon Creation! I'm so excited! I've been learning a lot and having fun already!!! Thia Gielow is the owner/creative designer of Get Inky! Stamps which offers super cute photopolymer and digital stamps. Check them out! It's definitely worth a look see...

As you know, my favorite thing lately has been competing in challenges. Well it's your turn now! The current Get Inky! Stamps challenge is Fabulous Floral Fun - use flowers in your project. The prizes are awesome!!


Supplies:
  • Stamps - Get Inky! Stamps: Buzzing Bees, Joyful Jar Drinks, Sew Sweet Cupcakes
  • card - DCWV
  • yellow layer - Recollections, embossed in the Anna Griffin Cuttlebug with Sizzix: Tim Holtz Alterations - honeycomb
  • white layer - Recollections
  • hybrid Ink - Perfect little black dress, Clear and Simple Stamps
  • Copic Markers - .05 multiliner black, Bee: Y06, 100, Stem: G07, Flower: R81, R83, R85, R20, colorless blender 0
  • Creative Memories corner rounder
  • ribbon from my stash
  • adhesives - Scotch ATG, painter's tape

I really let my creativity fly on this one to inspire and entice you! Get Inky! Stamps offers flowers in both physical and digital form but I wanted to show you how to get more out of the stamps by creating my own flower. The stamps I used were the bow in the Joyful Jar Drinks set and the curved ribbon in the Sew Sweet Cupcakes set. Both the bee and the sentiment came from the Buzzing Bees set (see below). 


In order to make the center of the flower, I masked off the other parts of the bow with painter's tape. Once I inked it up, I removed the tape and stamped my image.


Next, I masked off everything but the right side of the bow including some of the circle part to ensure continuity.

Using the same tape over and over, I re-inked the same petal and made my way around the circle.


Depending on how closely you stamp the petals you may need to apply a mask to the stamped image to make sure the last petal doesn't overlap. I find the new post it notes that are sticky over the entire surface work best. When you stamp the last petal some of the image will be stamped on the post it note.


Once the flower was done I used the curved ribbon stamp from the Sew Sweet Cupcakes set to create the stem. The rest is history! I hope this project inspired you to think out of the box when it comes to stamping! Thanks for stopping by!

Ok, now that you're done reading this post, please stop by the Get Inky! Stamps blog and leave a comment on my post there. You may learn something new about me... (oh and please mention you're a follower of mine. Thanks!) Then come back here and leave me a comment letting me know you did it. Why, you ask? Because one random follower (who comments on both blogs) will get a mystery prize!


This post appeared first on the blog C'est La-Vie Designs Unlimited, LLC

La-Vie