Monday, February 28, 2011

Christmas Card for the Troops


I designed this Christmas card to thank the troops for their service. A group of young children age 3-6 from my Jack and Jill of America group assembled several of the cards and they were sent in care packages for the troops through Give2thetroops. This was our community service project.
Here's the recipe:
  • card base - cricut cartridge plantin' schoolbook
  • card layer - white glittered cardstock Die Cuts With a View, punched with Martha Stewart Punch Around the page
  • reindeer - Cricut cartridge create a critter
  • Joy - cricut cartridge joys of the season
  • googly eyes
  • sentiment inside - Stampin Up!

La-Vie

Sunday, February 27, 2011

Nativity Christmas Card


Each holiday I volunteer at my daughter's Christian school. I lead the Pre-K and K classes in a craft. For Christmas, I used the Cricut Cartridge Inspired Heart and my Gypsy to create a one-of-a-kind card for the children to make for their parents.
Each silhouette on the cartridge has a base. I used my Gypsy to weld one base and a flipped base so that it would close as a card. I cut the card and the nativity scene at 5". The black cardstock represents night. The silver foil cardstock symbolizes the light of Jesus Christ. To stamp a sentiment on the inside we used stazon white opaque ink and a stampin up! stamp. The children also wrote inside with their white crayola crayons "For God so loved the world he gave His only begotten son." I always know I'll have a great time with the kiddies!
La-Vie

Saturday, February 26, 2011

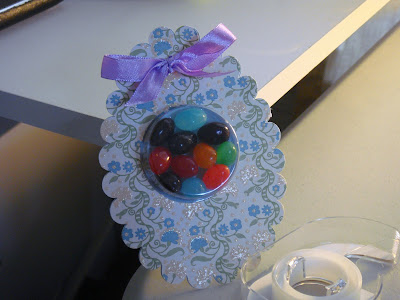
Easter treat for the Hunt


Each year my mom's group Mocha Moms Lehigh Valley hosts an Easter Egg hunt for our children. Since I am the President, I wanted to make an extra special treat for each child. I used the Cricut Seasonal Cartridge Easter to create the eggs. I used plain cardstock from my stash (Martha Stewart I think) and used Die Cuts With a View Nana's Nursery (for boys) paper stack and their glitter paper stack. I love that DCWV glitter stack because the glitter is trapped in the cardstock and will not prinkle out everywhere as you cut and handle it!! LOVELY!! I cut mirror images of the eggs so that they would line up by using the flip button on my Cricut Expression machine. LOVE MY CRICUT!!


Ok, so I used ribbon from my stash. The most specatacular part of this design is the treat cup from Stampin Up!. I also used one of their stamps. The treat cups are adhesive and I filled them with Jolly Rancher Jelly Beans - which are only available during the Easter season. YUM! get some today!


La-Vie

Friday, February 25, 2011

Birthday Celebration for Zora!


My Daughter's 6th Birthday at Sweet & Sassy - a V.I.P Pajama Party - was a big blow out! 19 girls had the time of their lives! I was able to create the invitations, cake and cupcake toppers, goody bag labels and thank you notes all using my Cricut Imagine and the Best Friends Cartidge. Friends and family were impressed by all of the coordination. That's when my card business began and folds started ordering left and right.

The invitation is based on an example in the Best Friends cartridge. I was able to print and cut the pretty African American girl with her robe and slippers. The sleepover label is also found on that cartridge. The cardstock is all from Die Cuts With a View - Nana's nursery paper stack for girls. I printed the details on my computer and added ribbon from my stash. I used the scrapsand Die Cuts With A View pocket of posies stack to make the thank you cards and just the head of the girl. The Imagine lets you print and cut in layers so that only certain aspects of a design can be chosen. The stamp is from Stampin Up! Cello treat bags were decorated with the slumber party tags and tied with ribbon.


The cake and cupcake toppers were made from mirror images of the girl's head (using the flip feature on the imagine) and sandwich picks. Sandwhich picks are sturdier and longer than toothpicks. I used wooden skewers for the cake decoration. baby girl HAD to have her own cake instead of one of the cupcakes. 6 year old demands...geesh. I cut the skewers to size once I attached the mirror images of the design elements.


La-Vie

Thursday, February 24, 2011

Newborn Onesies for Nephew Evan


I was inspired to make onesies for my newborn nephew Evan. It was a very trying experience as I have never tried this technique outside of the class at AC Moore where I learned the technique. It was supposed to be easy as 1-2-3 but it wasn't! When I finally got it right, the results were amazing! In the future, I hope to learn how to sew to hold down the design even more.
First, I purchased a cloth remnant from Hobby Lobby. I ironed it to a product called heat and bond. I applied the fused fabric to my cricut mat and cut out letters at 1" from cricut cartidge cuttin up and basic shapes at 2" from the cricut cartridge new arrival. I used my deep blade and lowered the speed with medium pressure. Once the images were cut, I took them off the mat and ironed the images to the shirt.
Tips & Tricks
  • The images and letters must be simple if not, the fabric will not cut properly
  • the mat must be new or VERY sticky - if not the fabric will move and the images will not cut properly
  • don't iron it too long or too short - the images will not stay on the shirt or the heat and bond will not stay on the fabric
  • use a piece of fabric at 12x12 size in case you need to repeat images. smaller pieces of fabric did not hold to the mat as well.
  • if you know how to sew, once the shirt has cooled, do a running stick with clear thread around all the design edges to anchor

La-Vie

Wednesday, February 23, 2011

Diaper Cake


On the day of my sister-in-law's babyshower, my 5 year old daughter and I made this diaper cake. I watched several youtube videos on the subject and got to work. We used a half case of size 3 huggies little movers diapers. My son had grown out of them and I wasn't sure what to do with them.
My daughter rolled all of the diapers and I tied gift curling ribbon around the middle. The trick is to roll the diaper tight and to hide the picture and name of the diapers. The curling ribbon used to hold the diapers is concealed under the brown ribbon. Rubber bands work well too.
The base of the cake has an inside layer of a few diapers that are lined up and tied with the curling ribbon. Then an outer layer was created around that. The next layer has one fewer layer and the top layer only have one set of diapers. I used my cricut imagine to print and cut the cake topper. I used the nursery tails cartridge and I printed a mirror image so that it would match up on both sides. I sandwiched a popsicle stick inbetween and stuck it into the one diaper that makes the top tier of the cake.
To finish it off, I wrapped the cake in ribbon and printed two each of the animals to match the thank you cards I created. Inking the edges helps the images to stand out. I made the larger animals for the bottom of the cake and made the smaller ones for higher up on the cake.
For the base, I used 3 scallop circles layered to make a big enough space to support the entire cake. It came out beautifully for a first try. Everyone thought it was a real cake and kept asking if I needed help carrying it at the shower.
Here's the recipe:
  • brown ribbon
  • diapers
  • popsicle stick
  • thin curling ribbon
  • 3 large scallop circles
  • cricut carts - animal kingdom, new arrival, zooballoo - 2 of each: monkey cut at 5" & 4", giraffe at 5" & 5.9" & lion at 4" & 5"
  • imagine cart - nursery tails
  • googly eyes

Comments please???

La-Vie

Tuesday, February 22, 2011

Baby Shower Thank You Cards


I designed these Thank You cards as a gift for my sister-in-law and her husband who recently had their first child. The nursery has a jungle theme and is decortated in these colors. I scraplifted a way of packaging the cards based on a technique learned from My Pink Stamper, my favorite crafter/blogger. I used clear cello treat bags usually used for birthday party gift bags and attached a card on top with a staple to match the contents.


Here's the recipe:
  • lion - and layers cut at 3" - Cricut cartridge animal kingdom

  • giraffe - and layers cut at 3.5" - Cricut cartridge animal kingdom

  • monkey - and layers cut at 3" - Cricut cartridge new arrival

  • thanks - and layers cut at 1.25 - Cricut cartridge Zooballoo

  • martha stewart punch around the page - scallop 3 dot, laurel leaf, double loops

  • stickles - crystal

  • ribbon from my stash

  • cello bags

  • for your shower stamp from Stampin' Up!

This was my first attempt at making sets of cards for someone as a gift. Comments please?


La-Vie

Monday, February 21, 2011

Cricut Circle Weekly Challenge #21 Animal Magnetism


Two posts in one day? I'm on FIRE!!


My daughter helped me put together this scrapbook page about our dog. The challenge requires an animal cut, animal print etc. The project must include at least 2 cricut cuts.


We used four legged friends cricut lite cartridge:
  • dog10 and layers cut at 6"
  • text and layers using real dial size for all cuts - 4 1/2", shift 2", layer button on 1", layer and shift 1 1/4"
  • Martha stewart punch around the page - ribbon loop
  • leopard patterened ribbon from my stash
  • 1.5 sheets of double sided paper from my stash
  • staples
  • Adhesive - Scotch pink ATG gun and zots small glue dots

So easy even a 6 year old can do it!! Toodles...

La-Vie

Cricut Circle Monthly Challenge - Banners


Each month the Cricut Circle announces a monthly challenge. For February, the challenge was to make a banner of any theme including 3 or more Cricut cuts. A random drawing will be done on March 1. The prize is 7 cricut imagine cartridges. I really really really want to win!! Pray for me and wish me luck!!


For my banner, I chose a supergirl theme. Since I am an at-home mom, I decided to make a supermom banner for my craft room. Please flood me with comments because I am super jazzed about this banner. It's my first one and it came out beautifully!


Here's the recipe:


  • Blue banner base and red banner base layer cut at 7" from cricut cartridge "tie the knot"

  • Supergirl 1 & 2, all layers and shadow cut at 5 1/2" from cricut cartridge "superman"

  • Supergirl symbol and all layers cut at 5" from cricut cartridge "superman"

  • Font and shadow cut at 3 1/4" from cricut cartridge "superman"

  • 5 yards of yellow ribbon

  • opaque white gel pen

  • Adhesives - Zots small glue dots, ATG gun, Zig 2-way glue pen

Notes: Putting together the licensed characters are very challenging. There are tiny pieces that look like nothing until they are all assembled and they are very delicate. I learned that leaving the pieces on the mat or together as a set still attached to the paper where it was cut very valuable. That way I would not lose anything or not be able to figure out the orientation of everything. I also used a skewer to help me place small parts in place. I used an opaque white gel pen for the eyes instead of trying to cut and place tiny white eyeballs.


~La-Vie

Thursday, February 17, 2011

Cricut Circle Weekly Challenge #20 Love notes


Check out my love note to my Cricut!


I'm entering the Cricut Circle weekly contest to create a love note. The guidelines are include a heart, embossing, and at least 2 Cricut cuts to qualify.


My love note to Cricut is made from:
  • love struck cricut seasonal cartridge

  • everyday cricut (exclusive Cricut Circle cartridge)

  • cuttlebug embossing folder from the "love is in the air" set

  • glossy accents

  • red stickles

  • pearls from my stash

Wish me luck!


La-Vie


Sunday, February 13, 2011

Stylish Blogger Award!!


OMG! I humble accept this Stylish blogger Award. This is is my first award as a blogger and crafter!! I am SOOO emotional right now!! A huge, HUGE thank you to Elizabeth of 217 Creations for giving me this award. There were so many crafters she could have chosen and I am touched that she chose me!!


Ok... here are the rules of this award.

1. thanks the person who gave you this award and link it back to their blog
2. share 8 things about yourself
3. pass this award to 8 other individuals
4. leave a comment on the 8 individuals' blog allowing them to pass on the recognition

*******************************************************************

8 Interesting facts about La-Vie

8. I am a married, stay-at-home mother of 2

7. I was a high school cheerleader

6. I studied abroad twice in college - Trinidad, W.I. and Lyon, France

5. My previous profession was Marketing Research & Consulting

4. I have a gift for writing and editing

3. I just started my own crafting business called C'est La-Vie Designs - custom invitations, cards, scrapbooks, home decor & more

2. I once was fluent in French

1. My favorite crafting tools are: bazzill and die cuts with a view card stock, pink ATG gun, zig glue pen, zig millenium pens, cuttlebug, cricut expression, my cricut imagine machines

8 Blogs I give this award to are:

8. Divine Domesticity

7. Simply Pam

6. Cricut Cuteness

5. The Serendipitous Scrapper

4. Create with Expression

3. The Paper Boutique

2. Creative Critters Cricut Club

1. My Pink Stamper

Friday, February 11, 2011

Baby Card using Cricut Imagine - Nursery Tails


It's been a while since I posted to my blog, but I have been crafting for pay! Yes, my first job as a paid professional! Yeah! Now that that's done, I am back to share more of my projects with you.

I'm spending some time over the next week on baby items I have made. Here is a baby card I made for someone who had her first child recently. I used my cricut imagine machine to print and cut these images. One of my new tricks is using curling ribbon (used for gifts usually) because it's inexpensive, available in a lot of colors and patterns. The only drawback is that it cannot be tied into bows. So I added a bow from a scrap of ribbon from my stash. All the shapes, colors and patterns were included as a part of the imagine machine and nursery tails cartridge. For the inside of the card I used a decorative scissors and another imagine cut. The stamps on the outside and inside are from stampin' up.
Happy Crafting!
La-Vie